 Yamaha XMax YP400RA - Owner's Manual > Air filter elements and check hoses and V-belt case air filter element
The air filter elements and the V-belt case air filter element should be serviced at the intervals specified in the periodic maintenance and lubrication chart. Service all air filter elements more frequently if you are riding in unusually wet or dusty areas.
Replacing the air filter elements
1. Place the scooter on the centerstand.
TIP
Continue as follows for each air filter element.
2. Remove the air filter case cover by removing the rubber caps and screws.
Left
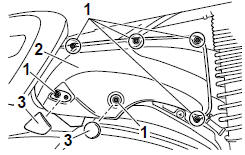
- Screw
- Air filter case cover
- Rubber cap
Right
- Screw
- Air filter case cover
- Rubber cap
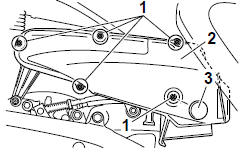
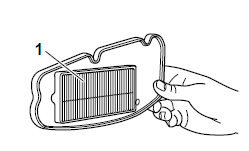
3. Pull the air filter element out.
Left
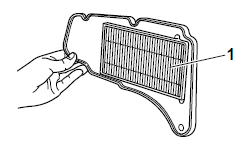
1. Air filter element
Right
- Air filter element
4. Insert a new air filter element into the air filter case.
5. Install the air filter case cover by installing the screws. NOTICE: Make sure that each filter element is properly seated in its case. Always replace both air filter elements at the same time, otherwise poor engine performance or damage to the engine may result. The engine should never be operated without the filter elements installed, otherwise the piston(s) and/or cylinder( s) may become excessively worn.
6. Install the rubber caps.
To clean the air filter check hoses
1. Check the hose at the bottom of both air filter cases for accumulated dirt or water.
Left

1. Air filter check hose
Right
- Air filter check hose
2. If dirt or water is visible, remove the hose, clean it, and then install it.
Cleaning the V-belt case air filter element
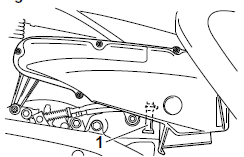
1. Remove panel A.
2. Remove the left air filter case cover.
3. Remove the V-belt air filter case cover by removing the screws.
- Screw
- V-belt air filter case cover
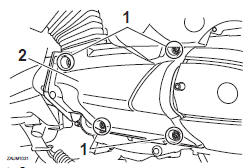
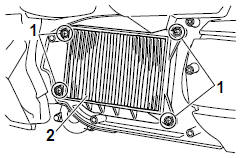
4. Remove the V-belt case air filter element by removing the screws.
- Screw
- V-belt case air filter element
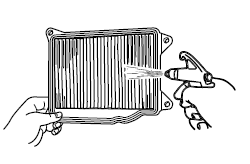
5. Lightly tap the V-belt case air filter element to remove most of the dust and dirt, and then blow out the dirt with compressed air as shown.
6. Check the V-belt case air filter element for damage and replace it if necessary.
7. Install the V-belt case air filter element by installing the screws.
NOTICE: Make sure that the Vbelt filter element is properly seated in its case.
8. Install the V-belt air filter case cover by installing the screws.
9. Install the left air filter case cover.
10. Install the panel.
Checking the throttle grip free play
The throttle grip free play should measure 3.0-5.0 mm (0.12-0.20 in) at the inner edge of the throttle grip. Periodically check the throttle grip free play and, if necessary, have a Yamaha dealer adjust it.
Valve clearance
The valve clearance changes with use, resulting in improper air-fuel mixture and/or engine noise. To prevent this from occurring, the valve clearance must be adjusted by a Yamaha dealer at the intervals specified in the periodic maintenance and lubrication chart.
Tires
Tires are the only contact between the vehicle and the road. Safety in all conditions of riding depends on a relatively small area of road contact. Therefore, it is essential to maintain the tires in good condition at all times and replace them at the appropriate time with the specified tires.
Tire air pressure
The tire air pressure should be checked and, if necessary, adjusted before each ride.
WARNING
Operation of this vehicle with improper tire pressure may cause severe injury or death from loss of control.
- The tire air pressure must be checked and adjusted on cold tires (i.e., when the temperature of the tires equals the ambient temperature).
- The tire air pressure must be adjusted in accordance with the riding speed and with the total weight of rider, passenger, cargo, and accessories approved for this model.
Tire air pressure (measured on cold tires): 0-90 kg (0-198 lb):
Front: 220 kPa (2.20 kgf/cm², 32 psi)
Rear: 250 kPa (2.50 kgf/cm², 36 psi)
YP400R 90-185 kg (198-408 lb) YP400RA 90-181 kg (198-399 lb):
Front: 220 kPa (2.20 kgf/cm², 32 psi)
Rear: 250 kPa (2.50 kgf/cm², 36 psi)
Maximum load*:
YP400R 185 kg (408 lb)
YP400RA 181 kg (399 lb)
* Total weight of rider, passenger, cargo and accessories
WARNING
Never overload your vehicle. Operation of an overloaded vehicle could cause an accident.
Tire inspection

- Tire sidewall
- Tire tread depth
The tires must be checked before each ride. If the center tread depth reaches the specified limit, if the tire has a nail or glass fragments in it, or if the sidewall is cracked, have a Yamaha dealer replace the tire immediately.
Minimum tire tread depth (front and rear):
1.6 mm (0.06 in)
TIP
The tire tread depth limits may differ from country to country. Always comply with the local regulations.
Tire information
This model is equipped with tubeless tires.
Tires age, even if they have not been used or have only been used occasionally.
Cracking of the tread and sidewall rubber, sometimes accompanied by carcass deformation, is an evidence of ageing. Old and aged tires shall be checked by tire specialists to ascertain their suitability for further use.
After extensive tests, only the tires listed below have been approved for this model by Yamaha Motor Co., Ltd.
Front tire:
Size: 120/70-15 M/C 56S
Manufacturer/model: MICHELIN/CITY GRIP
SAVA/DIAMONDS MC28
Rear tire:
Size: 150/70-13 M/C 64S
Manufacturer/model: MICHELIN/CITY GRIP
SAVA/DIAMONDS MC28
WARNING
- Have a Yamaha dealer replace excessively worn tires. Besides being illegal, operating the vehicle with excessively worn tires decreases riding stability and can lead to loss of control.
- The replacement of all wheel and brake-related parts, including the tires, should be left to a Yamaha dealer, who has the necessary professional knowledge and experience to do so.
- Ride at moderate speeds after changing a tire since the tire surface must first be "broken in" for it to develop its optimal characteristics.
Cast wheels
To maximize the performance, durability, and safe operation of your vehicle, note the following points regarding the specified wheels.
- The wheel rims should be checked for cracks, bends, warpage or other damage before each ride. If any damage is found, have a Yamaha dealer replace the wheel. Do not attempt even the smallest repair to the wheel. A deformed or cracked wheel must be replaced.
- The wheel should be balanced whenever either the tire or wheel has been changed or replaced. An unbalanced wheel can result in poor performance, adverse handling characteristics, and a shortened tire life.
- After repairing or replacing the rear tire, tighten the valve stem nut and locknut to the specified torques.

- Valve stem nut
- Valve stem locknut
Tightening torques:
Valve stem nut: 2.0 Nm (0.20 m*kgf, 1.4 ft*lbf)
Valve stem locknut: 3.0 Nm (0.30 m*kgf, 2.2 ft*lbf)
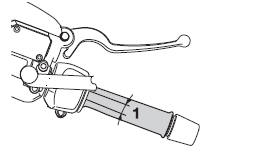
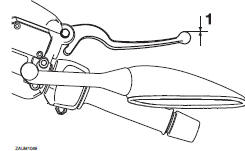
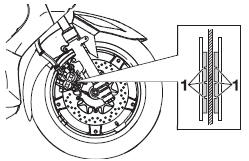
Checking the front and rear brake lever free play
Front
- No brake lever free play
Rear
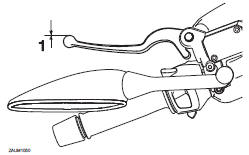
- No brake lever free play
There should be no free play at the brake lever ends. If there is free play, have a Yamaha dealer inspect the brake system.
WARNING
A soft or spongy feeling in the brake lever can indicate the presence of air in the hydraulic system. If there is air in the hydraulic system, have a Yamaha dealer bleed the system before operating the vehicle. Air in the hydraulic system will diminish the braking performance, which may result in loss of control and an accident.
Checking the front and rear brake pads
The front and rear brake pads must be checked for wear at the intervals specified in the periodic maintenance and lubrication chart.
Front brake pads
- Wear indicator groove
Each front brake pad is provided with wear indicator grooves, which allow you to check the brake pad wear without having to disassemble the brake.
To check the brake pad wear, check the wear indicator grooves. If a brake pad has worn to the point that the wear indicator grooves have almost disappeared, have a Yamaha dealer replace the brake pads as a set.
Rear brake pads
Have a Yamaha dealer check each rear brake pad for damage and measure the lining thickness and if necessary, replace them as a set.
See also:
 Yamaha XMax YP400RA - Owner's Manual > Final transmission oil
The final transmission case must be checked for oil leakage before each ride. If any leakage is found, have a Yamaha dealer check and repair the scooter. In addition, the final transmission oil must be changed as follows at the intervals specified in the periodic maintenance and lubrication chart.
Yamaha XMax YP400RA - Owner's Manual > Checking the brake fluid level
Before riding, check that the brake fluid is above the minimum level mark. Check the brake fluid level with the top of the reservoir level. Replenish the brake fluid if necessary.


