 Yamaha XMAX YP125R - Service manual > Cylinder head (YP125R)
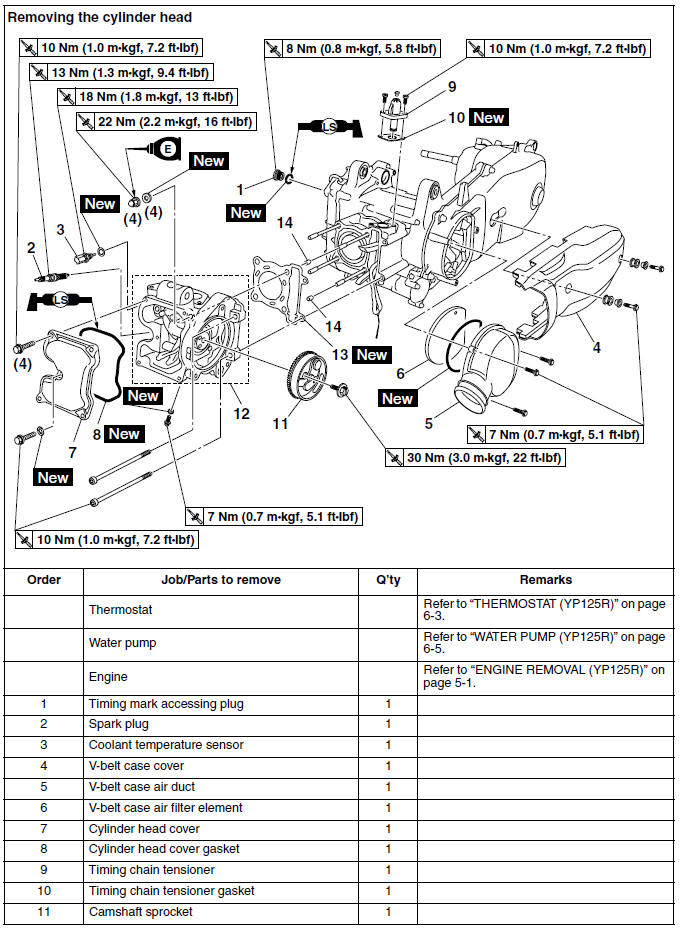
Removing the cylinder head
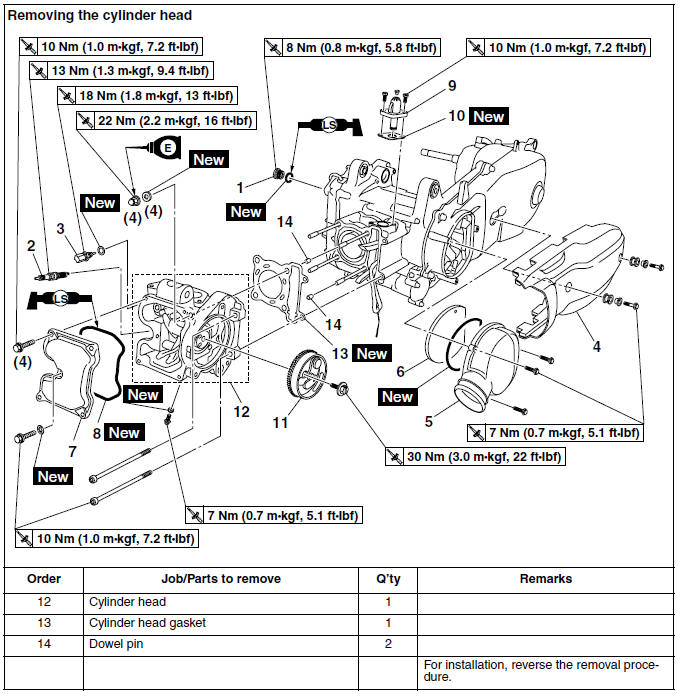
Removing the cylinder head
Removing the cylinder head
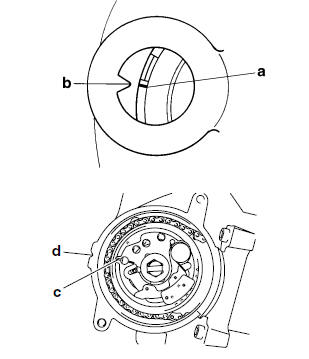
1. Align:
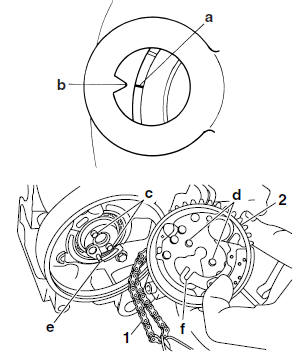
- "I" mark "a" on the generator rotor (with the stationary pointer "b" on the generator cover)
a. Turn the primary sheave nut on the left side of the crankshaft counterclockwise to turn the crankshaft.
b. When the piston is at TDC on the compression stroke, align the "I" mark "c" on the camshaft sprocket with the stationary pointer "d" on the cylinder head.
2. Loosen:
- Camshaft sprocket bolt "1"
TIP
While holding the primary sheave nut with a wrench, remove the camshaft sprocket bolt.
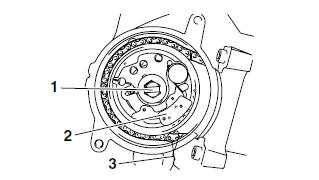
3. Remove:
- Timing chain tensioner (along with the gasket)
- Camshaft sprocket bolt "1"
- Camshaft sprocket "2"
TIP
To prevent the timing chain from falling into the crankcase, fasten it with a wire "3".
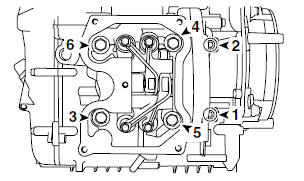
4. Remove:
- Cylinder head
TIP
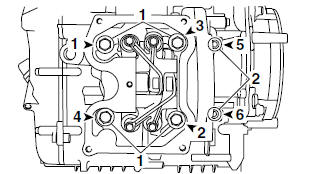
- Loosen the bolts and nuts in the proper sequence as shown.
- Loosen each bolt and nut 1/2 of a turn at a time. After all of the bolts and nuts are fully loosened, remove them.
Checking the cylinder head
1. Eliminate:
- Combustion chamber carbon deposits (with a rounded scraper)
TIP
Do not use a sharp instrument to avoid damaging or scratching:
- Spark plug bore threads
- Valve seats
2. Check:
- Cylinder head
Damage/scratches → Replace.
- Cylinder head water jacket
Mineral deposits/rust → Eliminate.
3. Measure:
- Cylinder head warpage
Out of specification → Resurface the cylinder head.
 Warpage limit
0.05 mm (0.0020 in)
Warpage limit
0.05 mm (0.0020 in)
a. Place a straightedge "1" and a thickness gauge "2" across the cylinder head.
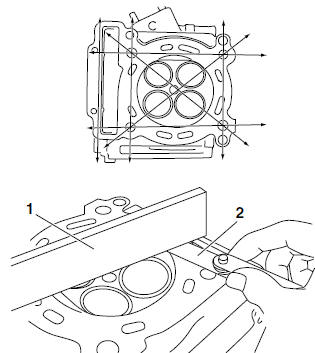
b. Measure the warpage.
c. If the limit is exceeded, resurface the cylinder head as follows.
d. Place 400-600 grit wet sandpaper on the surface plate and resurface the cylinder head using a figure-eight sanding pattern.
TIP
To ensure an even surface, rotate the cylinder head several times.
Checking the camshaft sprocket
1. Check:
- Camshaft sprocket
More than 1/4 tooth wear "a" → Replace the camshaft sprocket, timing chain and crankshaft as a set.
a. 1/4 tooth
b. Correct
1. Timing chain roller
2. Camshaft sprocket
Checking the timing chain tensioner
1. Check:
- Timing chain tensioner
Cracks/damage → Replace.
a. Remove the timing chain tensioner plug.
b. While lightly pressing the timing chain tensioner rod by hand, turn the tensioner rod fully clockwise with a thin screwdriver "1".
c. Remove the screwdriver and slowly release the timing chain tensioner rod.
d. Make sure that the timing chain tensioner rod comes out of the timing chain tensioner housing smoothly. If there is rough movement, replace the timing chain tensioner.
e. Install the timing chain tensioner plug.
Installing the cylinder head
1. Tighten:
- Cylinder head nuts "1"
 Cylinder head nut
22 Nm (2.2 m*kgf, 16 ft*lbf)
Cylinder head nut
22 Nm (2.2 m*kgf, 16 ft*lbf)
- Cylinder head bolts "2"
 Cylinder head bolt
10 Nm (1.0 m*kgf, 7.2 ft*lbf)
Cylinder head bolt
10 Nm (1.0 m*kgf, 7.2 ft*lbf)
TIP
- Lubricate the cylinder head nuts with engine oil.
- Tighten the cylinder head nuts and bolts in the proper tightening sequence as shown and torque them in two stages.
2. Install:
- Camshaft sprocket
- Timing chain
- Camshaft sprocket bolt
a. Turn the primary sheave nut on the left side of the crankshaft counterclockwise to turn the crankshaft.
b. Align the "I" mark "a" on the generator rotor with the stationary pointer "b" on the generator cover.
c. Install the timing chain "1" onto the camshaft sprocket "2", then the camshaft sprocket onto the camshaft, and then finger tighten the camshaft sprocket bolt.
TIP
Fit the projections "c" on the camshaft into the holes "d" in the camshaft sprocket and fit the pin "e" on the decompression cam into the slot "f" in the decompression lever on the camshaft sprocket.
NOTICE
Do not turn the crankshaft when installing the camshaft to avoid damage or improper valve timing.
d. Make sure the "I" mark "g" on the camshaft sprocket with the stationary pointer "h" on the cylinder head.
TIP
When installing the camshaft sprocket, be sure to keep the timing chain as tight as possible on the exhaust side.

e. While holding the primary sheave nut with a wrench, temporarily tighten the camshaft sprocket bolt.
f. Remove the wire from the timing chain.
3. Install:
- Timing chain tensioner gasket

- Timing chain tensioner
a. Remove the timing chain tensioner plug.
b. While lightly pressing the timing chain tensioner rod by hand, turn the tensioner rod fully clockwise with a thin screwdriver "1".
TIP
Make sure that the tensioner rod has been fully turned clockwise.
c. Install the gasket and the timing chain tensioner "2" onto the cylinder.
WARNING
Always use a new gasket.
TIP
Apply sealant to the threads of the timing chain tensioner bolts.
 Yamaha bond No. 1215
90890-85505
(Three Bond No.1215)
Yamaha bond No. 1215
90890-85505
(Three Bond No.1215)
 Timing chain tensioner bolt
10 Nm (1.0 m*kgf, 7.2 ft*lbf)
Timing chain tensioner bolt
10 Nm (1.0 m*kgf, 7.2 ft*lbf)
d. Turn the timing chain tensioner rod counterclockwise with a thin screwdriver "1", make sure it releases, and then install the timing chain tensioner plug.
4. Turn:
- Crankshaft (turn the primary sheave nut on the left side of the crankshaft several turns counterclockwise)
5. Check:
- "I" mark "a".
Make sure the "I" mark "a" on the generator rotor is aligned with the stationary pointer "b" on the generator cover.
- "I" mark "c"
Make sure the "I" mark "c" on the camshaft sprocket is aligned with the stationary pointer "d" on the cylinder head.
Out of alignment → Correct.
Refer to the installation steps above.

6. Tighten:
- Camshaft sprocket bolt
 Camshaft sprocket bolt
30 Nm (3.0 m*kgf, 22 ft*lbf)
Camshaft sprocket bolt
30 Nm (3.0 m*kgf, 22 ft*lbf)
NOTICE
Be sure to tighten the camshaft sprocket bolt to the specified torque to avoid the possibility of the bolt coming loose and damaging the engine.
7. Measure:
- Valve clearance
Out of specification → Adjust.
See also:
 Yamaha XMAX YP125R - Service manual > Engine removal (YP125R)
Removing the muffler and exhaust pipe Disconnecting the leads and hoses Disconnecting the leads and hoses Removing the engine
Yamaha XMAX YP125R - Service manual > Camshaft (YP125R)
Removing the rocker arms and camshaft Removing the camshaft


