 Yamaha XMax YP400RA - Owner's Manual > Handlebar switches
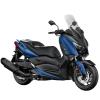
Left
- Pass switch "
 "
" - Dimmer switch "
 /
/
 "
" - Turn signal switch "
 /
/ "
" - Horn switch "
 "
"
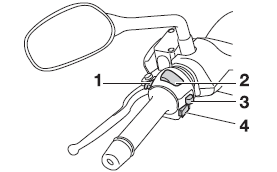
Right
- Hazard switch "
 "
" - Start switch "
 "
"
Pass switch " "
"
Press this switch to flash the headlight.
Dimmer switch " /
/
 "
"
Set this switch to " " for the
high beam and to "
" for the
high beam and to " " for the low beam.
Turn signal switch " /
/ "
"
To signal a right-hand turn, push this switch to "  ".
To signal a left-hand turn, push this switch to "
".
To signal a left-hand turn, push this switch to " ". When released, the switch returns to the center position. To cancel the turn
signal lights, push the switch in after it has returned to the center position.
". When released, the switch returns to the center position. To cancel the turn
signal lights, push the switch in after it has returned to the center position.
Horn switch "  "
"
Press this switch to sound the horn.
Start switch "  "
"
With the sidestand up, push this switch while applying the front or rear brake to crank the engine with the starter. See page 5-1 for starting instructions prior to starting the engine.
The engine trouble warning light will come on when the key is turned to "ON" and the start switch is pushed, but this does not indicate a malfunction.
Hazard switch " "
"
With the key in the "ON" or "  "
position, use this switch to turn on the hazard lights (simultaneous flashing of
all turn signal lights).
"
position, use this switch to turn on the hazard lights (simultaneous flashing of
all turn signal lights).
The hazard lights are used in case of an emergency or to warn other drivers when your vehicle is stopped where it might be a traffic hazard.
NOTICE
Do not use the hazard lights for an extended length of time with the engine not running, otherwise the battery may discharge.
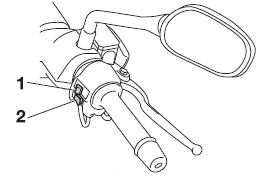
Front brake lever
1. Front brake lever
The front brake lever is located on the right side of the handlebar. To apply the front brake, pull this lever toward the throttle grip.
Rear brake lever
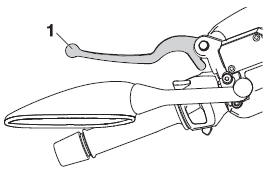
1. Rear brake lever
The rear brake lever is located on the left side of the handlebar. To apply the rear brake, pull this lever toward the handlebar grip.
ABS (for ABS models)
The Yamaha ABS (Anti-lock Brake System) features a dual electronic control system, which acts on the front and rear brakes independently.
Operate the brakes with ABS as you would conventional brakes. If the ABS is activated, a pulsating sensation may be felt at the brake levers. In this situation, continue to apply the brakes and let the ABS work; do not "pump" the brakes as this will reduce braking effectiveness.
WARNING
Always keep a sufficient distance from the vehicle ahead to match the riding speed even with ABS.
- The ABS performs best with long braking distances.
- On certain surfaces, such as rough or gravel roads, the braking distance may be longer with the ABS than without.
The ABS is monitored by an ECU, which will revert the system to conventional braking if a malfunction occurs.
TIP
- The ABS performs a self-diagnosis test each time the vehicle first starts off after the key is turned to "ON" and the vehicle has traveled at a speed of 10 km/h (6 mi/h) or higher. During this test, a "clicking" noise can be heard from the front of the vehicle, and if either brake lever is even slightly applied, a vibration can be felt at the lever, but these do not indicate a malfunction.
- This ABS has a test mode which allows the owner to experience the pulsation at the brake levers when the ABS is operating. However, special tools are required, so please consult your Yamaha dealer when performing this test.
NOTICE
Keep any type of magnets (including magnetic pick-up tools, magnetic screwdrivers, etc.) away from the front and rear wheel hubs, otherwise the magnetic rotors equipped in the wheel hubs may be damaged, resulting in improper performance of the ABS system.
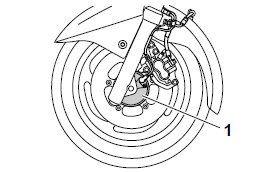
1. Front wheel hub
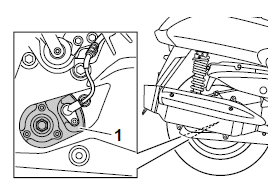
1. Rear wheel hub
See also:
 Yamaha XMax YP400RA - Owner's Manual > Multi-function display
WARNING Be sure to stop the vehicle before making any setting changes to the multi-function display. Changing settings while riding can distract the operator and increase the risk of an accident. Clock Ambient temperature display Fuel meter Odometer/tripmeters/fuel reserve tripmeter "SELECT" button "RESET" button Coolant temperature meter V-belt replacement indicator "V-BELT" Oil change indicator "OIL CHANGE" Icy road warning indicator " "
Yamaha XMax YP400RA - Owner's Manual > Fuel tank cap
To open the fuel tank cap Fuel tank cap Fuel tank cap cover


