 Yamaha XMAX YP125R - Service manual > Starter clutch and generator (YP125R)
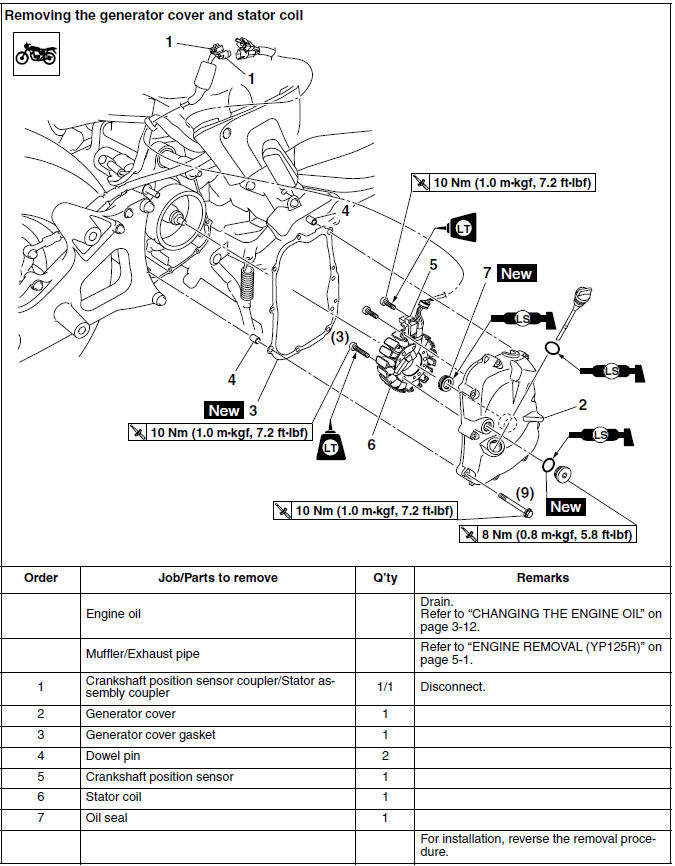
Removing the generator cover and stator coil
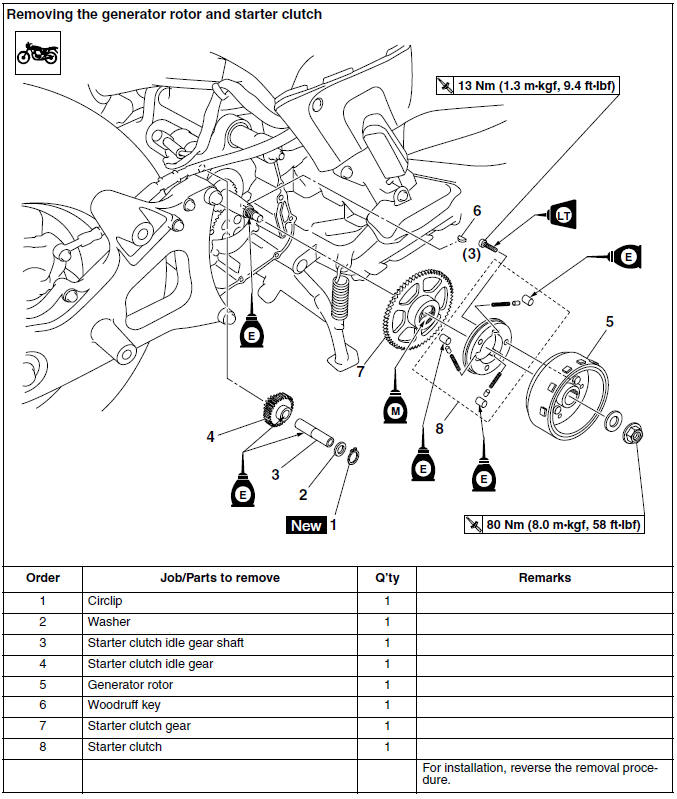
Removing the generator rotor and starter clutch
Removing the generator
1. Remove:
- Generator cover
TIP
Loosen each bolt 1/4 of a turn at a time, in stages and in a crisscross pattern. After all of the bolts are fully loosened, remove them.
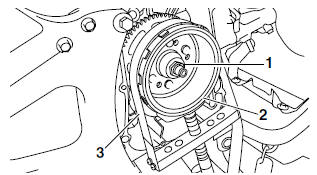
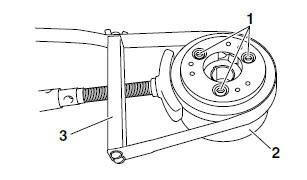
2. Remove:
- Generator rotor nut "1"
- Washer
TIP
- While holding the generator rotor "2" with the sheave holder "3", loosen the generator rotor nut.
- Do not allow the sheave holder to touch the projection on the generator rotor.
 Sheave holder
90890-01701
Sheave holder
90890-01701
Primary clutch holder YS-01880-A
3. Remove:
- Generator rotor "1" (with the flywheel puller "2")
- Woodruff key
NOTICE
To protect the end of the crankshaft, place an appropriate sized socket between the flywheel puller set center bolt and the crankshaft.
TIP
Make sure the flywheel puller is centered over the generator rotor.
 Flywheel puller
90890-01362
Flywheel puller
90890-01362
Heavy duty puller YU-33270-B
Removing the starter clutch
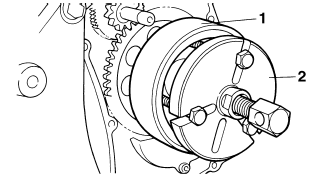
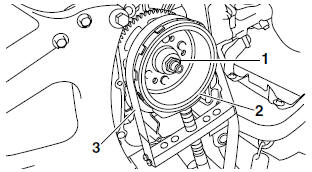
1. Remove:
- Starter clutch bolts "1"
- Starter clutch
TIP
- While holding the generator rotor "2" with the sheave holder "3", remove the starter clutch bolts.
- Do not allow the sheave holder to touch the projection on the generator rotor.
 Sheave holder
90890-01701
Sheave holder
90890-01701
Primary clutch holder YS-01880-A
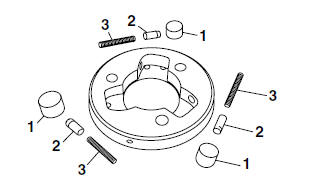
Checking the starter clutch
1. Check:
- Starter clutch rollers "1"
- Starter clutch spring caps "2"
- Starter clutch springs "3"
Damage/wear → Replace.
2. Check:
- Starter clutch idle gear
- Starter clutch gear
Burrs/chips/roughness/wear → Replace the defective part(s).
3. Check:
- Starter clutch gear contact surfaces
Damage/pitting/wear → Replace the starter clutch gear.
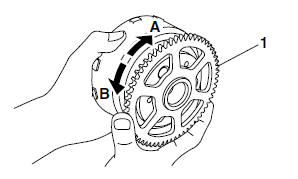
4. Check:
- Starter clutch operation
a. Install the starter clutch gear "1" onto the starter clutch and hold the generator rotor.
b. When turning the starter clutch gear clockwise "A", the starter clutch and the starter clutch gear should turn freely, otherwise the starter clutch is faulty and must be replaced.
c. When turning the starter clutch gear counterclockwise "B", it should engage, otherwise the starter clutch is faulty and must be replaced.
Installing the starter clutch
1. Install:
- Starter clutch
- Starter clutch bolts "1"
 Starter clutch bolt
13 Nm (1.3 m*kgf, 9.4 ft*lbf)
LOCTITE
Starter clutch bolt
13 Nm (1.3 m*kgf, 9.4 ft*lbf)
LOCTITE
TIP
- While holding the generator rotor "2" with the sheave holder "3", tighten the starter clutch bolts.
- Do not allow the sheave holder to touch the projection on the generator rotor.
 Sheave holder
90890-01701
Sheave holder
90890-01701
Primary clutch holder YS-01880-A
Installing the generator
1. Install:
- Starter clutch gear
- Woodruff key
- Generator rotor
- Washer
- Generator rotor nut
TIP
- Clean the tapered portion of the crankshaft and the generator rotor hub.
- When installing the generator rotor, make sure the woodruff key is properly seated in the keyway of the crankshaft.
- Lubricate the crankshaft end threads with engine oil.
- Make sure that the blunt-edged corner of the washer is facing outward.
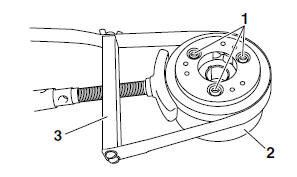
2. Tighten:
- Generator rotor nut "1"
 Generator rotor nut
80 Nm (8.0 m*kgf, 58 ft*lbf)
Generator rotor nut
80 Nm (8.0 m*kgf, 58 ft*lbf)
TIP
- While holding the generator rotor "2" with the sheave holder "3", tighten the generator rotor nut.
- Do not allow the sheave holder to touch the projection on the generator rotor.
 Sheave holder
90890-01701
Sheave holder
90890-01701
Primary clutch holder YS-01880-A
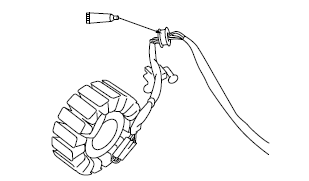
3. Apply:
- Sealant (onto the crankshaft position sensor/stator assembly lead grommet)
 Yamaha bond No. 1215
90890-85505
(Three Bond No.1215)
Yamaha bond No. 1215
90890-85505
(Three Bond No.1215)
4. Install:
- Oil seal "1"

 Oil seal installed depth
4.5-5.4 mm (0.18-0.21 in)
Oil seal installed depth
4.5-5.4 mm (0.18-0.21 in)

a. Oil seal installed depth
5. Install:
- Generator cover
 Generator cover bolt
10 Nm (1.0 m*kgf, 7.2 ft*lbf)
Generator cover bolt
10 Nm (1.0 m*kgf, 7.2 ft*lbf)
TIP
Tighten the generator cover bolts in stages and in a crisscross pattern.
Electric starter (YP125R)
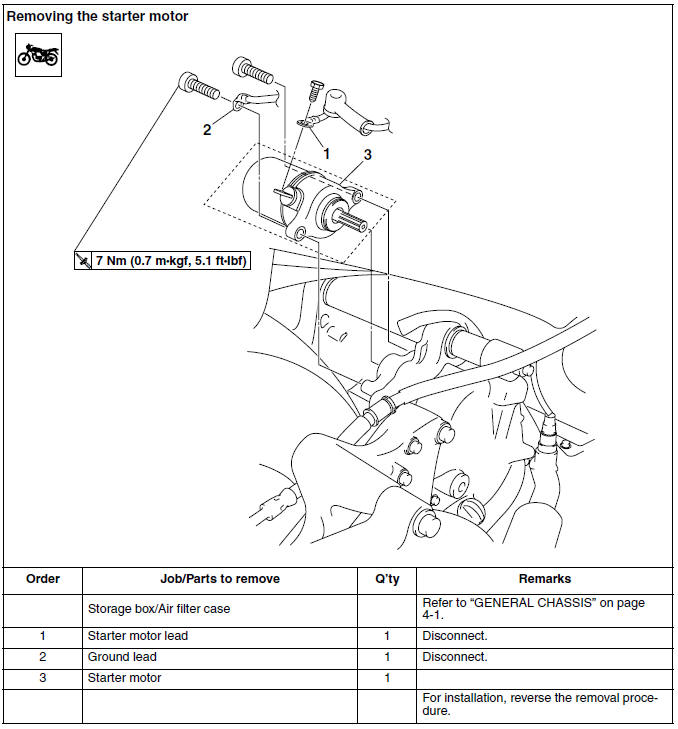
Removing the starter motor
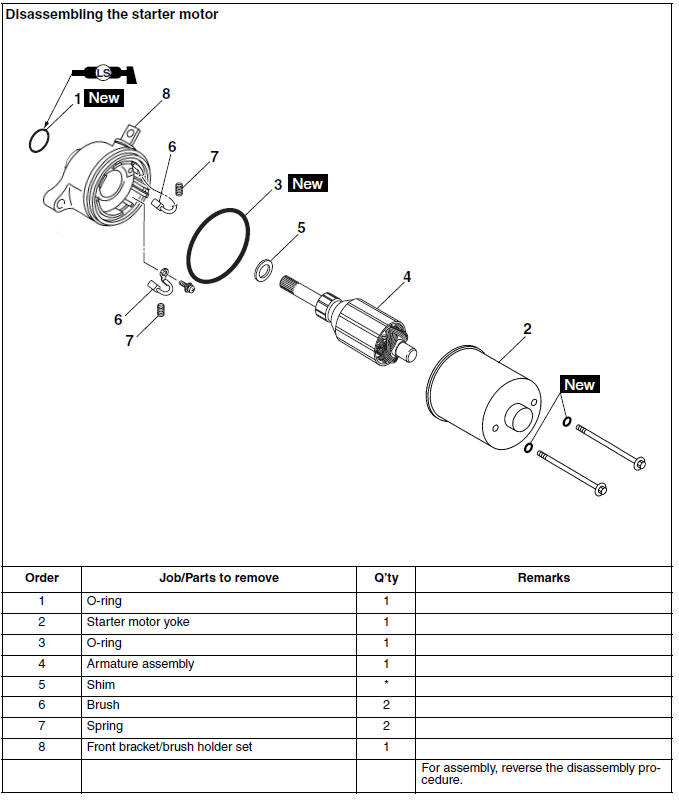
Disassembling the starter motor
Checking the starter motor
1. Check:
- Commutator
Dirt → Clean with 600 grit sandpaper.
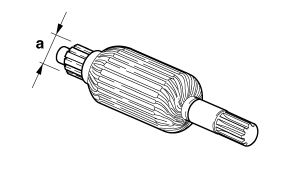
2. Measure:
- Commutator diameter "a"
Out of specification → Replace the starter motor.
 Limit
16.6 mm (0.65 in)
Limit
16.6 mm (0.65 in)
3. Measure:
- Mica undercut "a"
Out of specification → Scrape the mica to the proper measurement with a hacksaw blade that has been grounded to fit the commutator.
 Mica undercut (depth)
1.35 mm (0.05 in)
Mica undercut (depth)
1.35 mm (0.05 in)
TIP
The mica of the commutator must be undercut to ensure proper operation of the commutator.

4. Measure:
- Armature assembly resistances (commutator and insulation) Out of specification → Replace the starter motor.
a. Measure the armature assembly resistances with the digital circuit tester.
 Digital circuit tester
90890-03174
Digital circuit tester
90890-03174
Model 88 Multimeter with tachometer YU-A1927
 Armature coil
Commutator resistance "1" Continuity (0.0378-0.0462 Ω at 20 ºC (68 ºF))
Insulation resistance "2" No continuity (Above 1 MΩ at 20 ºC (68 ºF))
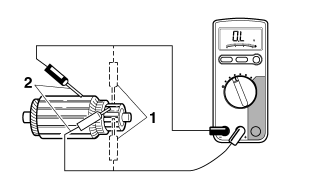
b. If any resistance is out of specification, replace the starter motor.
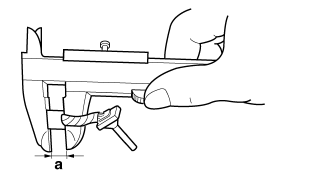
5. Measure:
- Brush length "a"
Out of specification → Replace the brushes as a set.
 Limit
3.50 mm (0.14 in)
Limit
3.50 mm (0.14 in)
6. Measure:
- Brush spring force
Out of specification → Replace the brush springs as a set.
 Brush spring force
3.92-5.88 N (400-600 gf, 14.11-
21.17 oz)
Brush spring force
3.92-5.88 N (400-600 gf, 14.11-
21.17 oz)
7. Check:
- Gear teeth
Damage/wear → Replace the gear.
8. Check:
- Bearing
- Oil seal
- Bushing
Damage/wear → Replace the defective part(s).
See also:
 Yamaha XMAX YP125R - Service manual > V-belt automatic transmission (YP125R)
Removing the V-belt case cover Removing the V-belt, primary sheave and secondary sheave
Yamaha XMAX YP125R - Service manual > Oil pump (YP125R)
Removing the oil pump Checking the oil pump 1. Check: Oil pump drive gear Oil pump driven gear Oil pump housing Oil pump housing cover


