 Yamaha XMAX YP125R - Service manual > V-belt automatic transmission (YP250R)
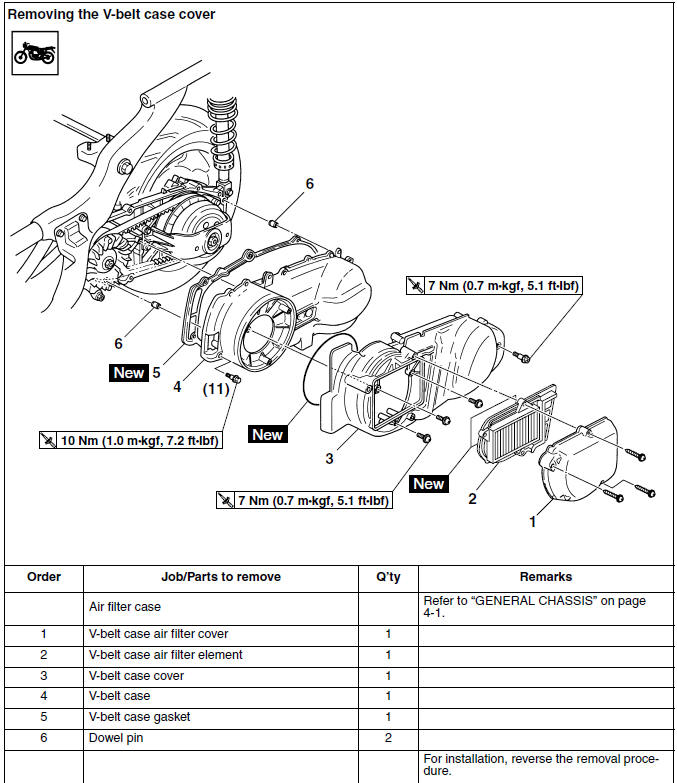
Removing the V-belt case cover
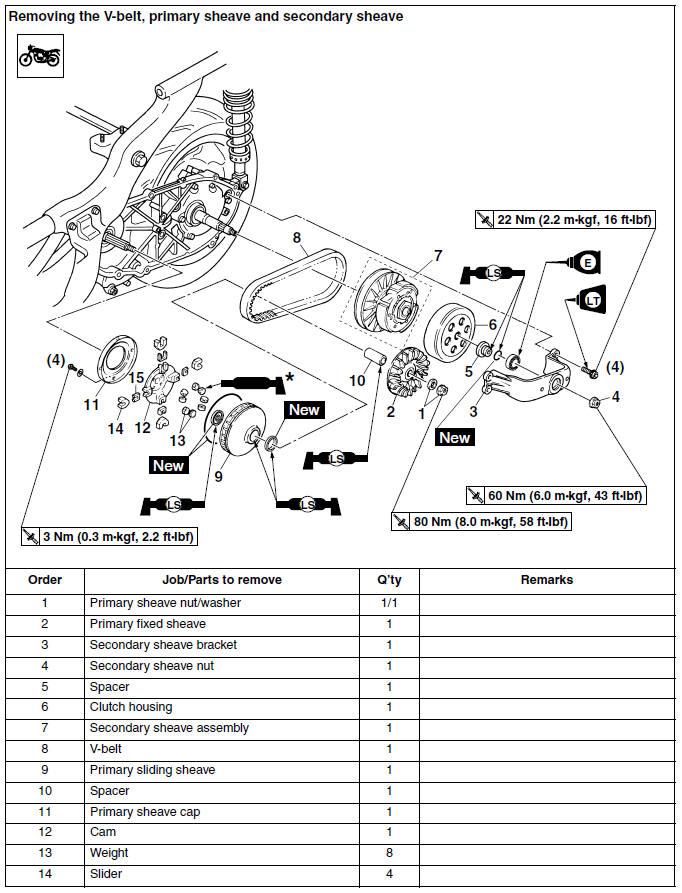
Removing the V-belt, primary sheave and secondary sheave
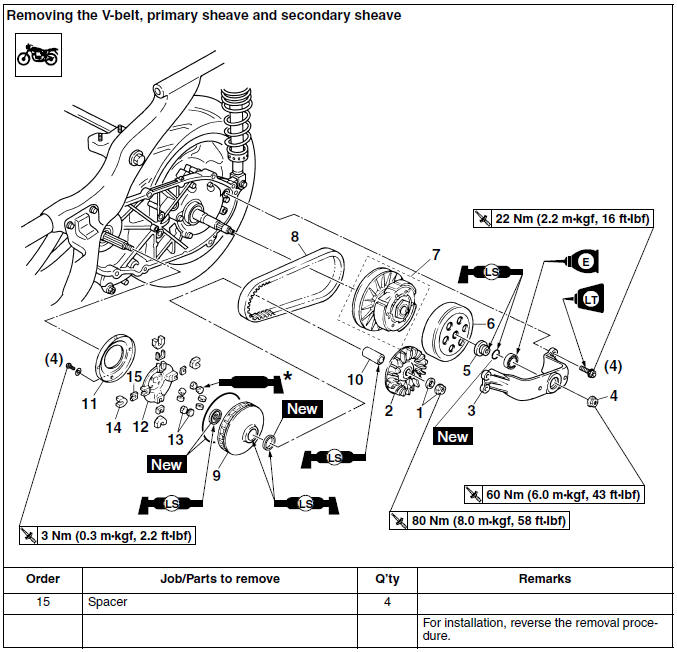
Removing the V-belt, primary sheave and secondary sheave
* Apply Shell BT grease 3 (Yamaha grease G 90793-40016).
 Yamaha grease G
90793-40016
Yamaha grease G
90793-40016
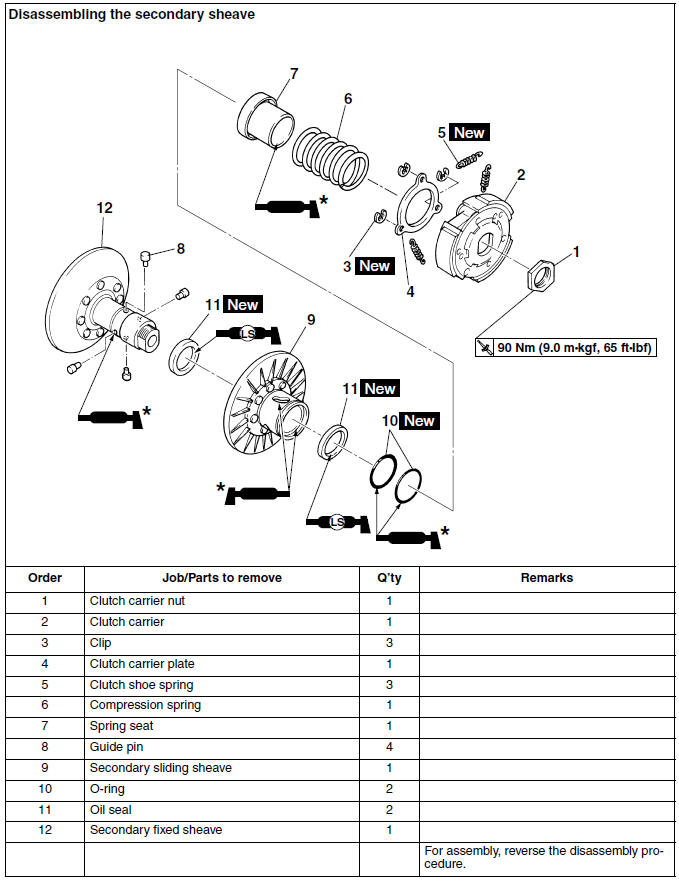
Disassembling the secondary sheave
* Apply BEL-RAY assembly lube.
Removing the primary sheave
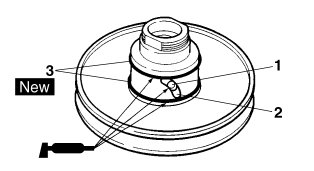
1. Remove:
- V-belt case
TIP
Loosen each bolt 1/4 of a turn at a time, in stages and in a crisscross pattern. After all of the bolts are fully loosened, remove them.
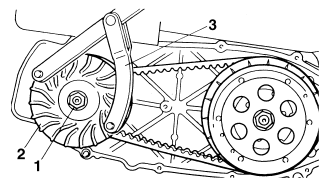
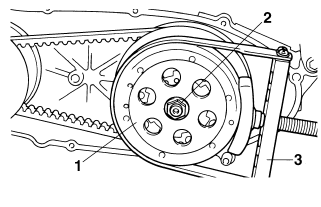
2. Remove:
- Primary sheave nut "1"
- Washer
- Primary fixed sheave "2"
TIP
While holding the primary fixed sheave with the rotor holding tool "3", loosen the primary sheave nut.
 Rotor holding tool
90890-01235
Rotor holding tool
90890-01235
Universal magneto & rotor holder YU-01235
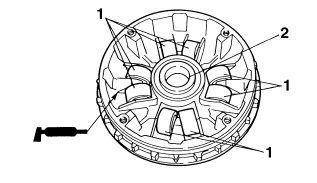
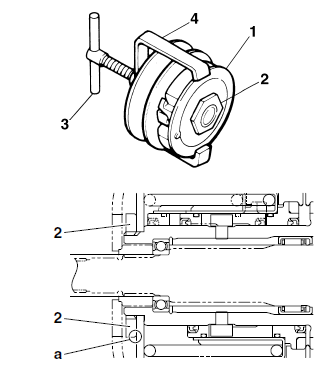
Removing the secondary sheave
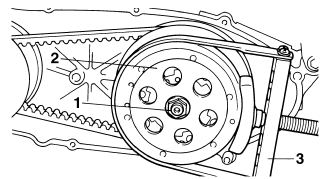
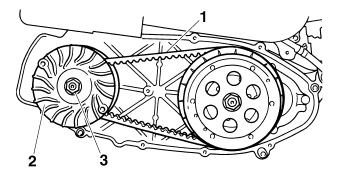
1. Remove:
- Secondary sheave nut "1"
- Spacer
- Clutch housing "2"
TIP
While holding the clutch housing with the sheave holder "3", loosen the secondary sheave nut.
 Sheave holder
90890-01701
Sheave holder
90890-01701
Primary clutch holder YS-01880-A
2. Loosen:
- Clutch carrier nut "1"
NOTICE
Do not remove the clutch carrier nut at this stage.
TIP
While holding the clutch carrier with the sheave holder "2", loosen the clutch carrier nut one full turn with the locknut wrench "3".
 Sheave holder
90890-01701
Sheave holder
90890-01701
Primary clutch holder YS-01880-A
Locknut wrench 90890-01348 YM-01348

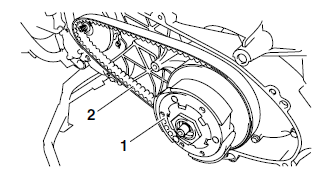
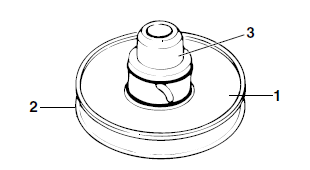
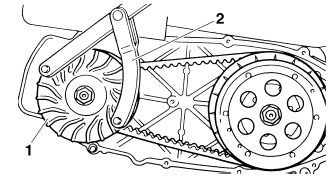
3. Remove:
- Secondary sheave assembly "1"
- V-belt "2"
TIP
Remove the V-belt and secondary sheave assembly from the primary sheave side.
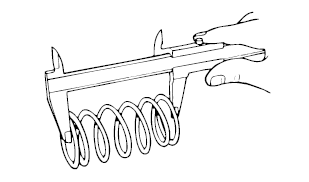
Disassembling the secondary sheave
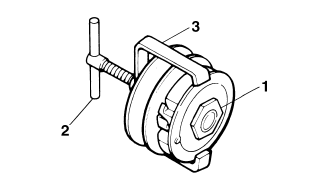
1. Remove:
- Clutch carrier nut "1"
TIP
While compressing the compression spring with the clutch spring holder "2" and clutch spring holder arm "3", remove the clutch carrier nut.
 Clutch spring holder
90890-01337
Clutch spring holder
90890-01337
Clutch spring holder arm 90890-01464
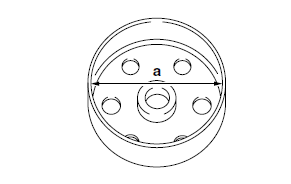
Checking the clutch housing
1. Check:
- Clutch housing
Damage/wear → Replace.
2. Measure:
- Clutch housing inside diameter "a"
Out of specification → Replace the clutch housing.
 Clutch housing inside diameter
145.0 mm (5.71 in)
Clutch housing inside diameter
145.0 mm (5.71 in)
Limit 145.5 mm (5.73 in)
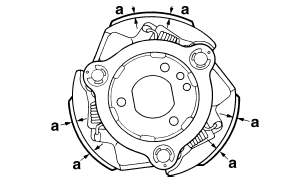
Checking the clutch shoes
The following procedure applies to all of the clutch shoes.
1. Check:
- Clutch shoe
Damage/wear → Replace the clutch shoes and springs as a set.
Glazed areas → Sand with coarse sandpaper.
TIP
After sanding the glazed areas, clean the clutch with a cloth.
2. Measure:
- Clutch shoe thickness "a"
Out of specification → Replace the clutch shoes and springs as a set.
 Clutch shoe thickness
3.3 mm (0.13 in)
Clutch shoe thickness
3.3 mm (0.13 in)
Wear limit 2.0 mm (0.08 in)
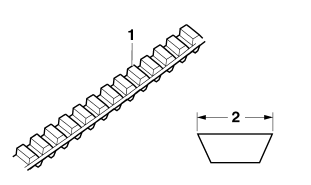
Checking the v-belt
1. Check:
- V-belt "1"
Cracks/damage/wear → Replace.
Grease/oil → Clean the primary and secondary sheave.
2. Measure:
- V-belt width "2"
Out of specification → Replace.
 V-belt width
23.0 mm (0.91 in)
V-belt width
23.0 mm (0.91 in)
Limit 21.0 mm (0.83 in)
Checking the primary sheave
1. Check:
- Primary sliding sheave
- Primary fixed sheave
- Spacer
Cracks/damage/wear → Replace the primary sliding sheave and primary fixed sheave as a set.
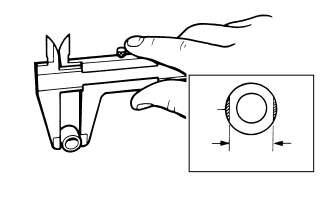
Checking the primary sheave weights
The following procedure applies to all of the primary sheave weights.
1. Check:
- Primary sheave weight
Cracks/damage/wear → Replace.
2. Measure:
Primary sheave weight outside diameter Out of specification → Replace.
 Weight outside diameter
20.0 mm (0.79 in)
Weight outside diameter
20.0 mm (0.79 in)
Limit 19.5 mm (0.77 in)
Checking the primary sheave sliders
1. Check:
- Primary sheave slider
Cracks/damage/wear → Replace.
Checking the secondary sheave
1. Check:
- Secondary fixed sheave
- Secondary sliding sheave
Cracks/damage/wear → Replace the secondary fixed and sliding sheaves as a set.
2. Check:
- Torque cam groove "1"
Damage/wear → Replace the secondary fixed and sliding sheaves as a set.
3. Check:
- Guide pin "2"
Damage/wear → Replace the secondary fixed and sliding sheaves as a set.
4. Check:
- Spring free length
Out of specification → Replace the spring.
 Compression spring free
length
102.4 mm (4.03 in)
Compression spring free
length
102.4 mm (4.03 in)
Limit 90.0 mm (3.54 in)
Assembling the primary sheave
1. Clean:
- Primary fixed sheave
- Primary sliding sheave
- Spacer
- Primary sheave weights
- Cam
2. Install:
- Primary sheave weights "1"
- Spacer "2"
TIP
Before installing the primary sheave weights, lubricate the inside and outside of each weight with Shell BT grease 3.
 Recommended lubricant
Shell BT grease 3
Recommended lubricant
Shell BT grease 3
Assembling the secondary sheave
1. Lubricate:
- Secondary fixed sheave's inner surface "1"
- Secondary sliding sheave's inner surface "2"
- Oil seals
- Bearing (with the recommended lubricant)
 Recommended lubricant
BEL-RAY assembly lube
Recommended lubricant
BEL-RAY assembly lube

2. Install:
- Oil seals

- Secondary sliding sheave "1"
TIP
Install the secondary sliding sheave onto the secondary fixed sheave "2" with the oil seal guide "3".
 Oil seal guide (ø41)
90890-01396
Oil seal guide (ø41)
90890-01396
3. Install:
- Guide pins "1"
4. Lubricate:
- Guide pin grooves "2"
- O-rings "3"
 (with the
recommended lubricant)
(with the
recommended lubricant)
 Recommended lubricant
BEL-RAY assembly lube
Recommended lubricant
BEL-RAY assembly lube
5. Install:
- Spring seat
- Compression spring
- Spacer
- Clutch carrier "1"
- Clutch carrier nut "2"
TIP
- While compressing the compression spring with the clutch spring holder "3" and clutch spring holder arm "4", install the clutch carrier nut.
- Install the clutch carrier nut "2" with its tapered side "a" facing the clutch carrier.
 Clutch spring holder
90890-01337
Clutch spring holder
90890-01337
Clutch spring holder arm 90890-01464
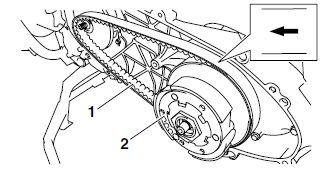
Installing the v-belt
1. Install:
- V-belt "1"
- Secondary sheave assembly "2"
NOTICE
Do not allow grease to come in contact with the V-belt or secondary sheave assembly.
TIP
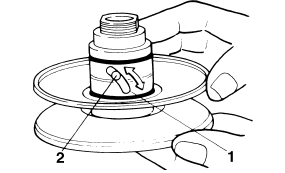
- Install the V-belt with the printed arrow mark on the V-belt facing in the direction shown in the illustration.
- Install the V-belt onto the primary sheave side.
2. Tighten:
- Clutch carrier nut "1"
 Clutch carrier nut
90 Nm (9.0 m*kgf, 65 ft*lbf)
Clutch carrier nut
90 Nm (9.0 m*kgf, 65 ft*lbf)
TIP
While holding the clutch carrier with the sheave holder "2", tighten the clutch carrier nut with the locknut wrench "3".
 Sheave holder
90890-01701
Sheave holder
90890-01701
Primary clutch holder YS-01880-A
Locknut wrench 90890-01348 YM-01348
3. Install:
- Clutch housing "1"
- Spacer
- Secondary sheave nut "2"
 Secondary sheave nut
60 Nm (6.0 m*kgf, 43 ft*lbf)
Secondary sheave nut
60 Nm (6.0 m*kgf, 43 ft*lbf)
TIP
While holding the clutch housing with the sheave holder "3", tighten the secondary sheave nut.
 Sheave holder
90890-01701
Sheave holder
90890-01701
Primary clutch holder YS-01880-A
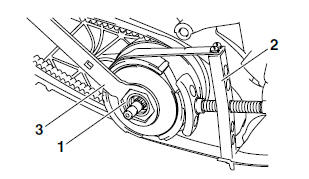
4. Install:
- V-belt "1"
- Primary fixed sheave "2"
- Washer
- Primary sheave nut "3"
NOTICE
Do not allow grease to contact the primary sheave assembly.
TIP
Install the V-belt in the primary sheave (when the pulley is at its widest position) and in the secondary sheave (when the pulley is at its narrowest position), and make sure the V-belt is tight.
5. Tighten:
- Primary sheave nut "1"
 Primary sheave nut
80 Nm (8.0 m*kgf, 58 ft*lbf)
Primary sheave nut
80 Nm (8.0 m*kgf, 58 ft*lbf)
TIP
While holding the primary fixed sheave with the rotor holding tool "2", tighten the primary sheave nut.
 Rotor holding tool
90890-01235
Rotor holding tool
90890-01235
Universal magneto & rotor holder YU-01235
6. Install:
- V-belt case
TIP
- Make sure that the V-belt case gasket lip fits properly around the V-belt case.
- Tighten the V-belt case bolts in stages and in a crisscross pattern.
See also:
 Yamaha XMAX YP125R - Service manual > Cylinder and piston (YP250R)
Removing the cylinder and piston Removing the piston
Yamaha XMAX YP125R - Service manual > Starter clutch and generator (YP250R)
Removing the generator cover and stator coil Removing the generator rotor and starter clutch


