 Suzuki Burgman 400 - Service manual > Brake Fluid Information
! WARNING
- This brake system is filled with an ethylene glycol-based DOT 4 brake fluid. Do not use or mix different types of fluid, such as silicone-based or petroleum-based.
- Do not use any brake fluid taken from old, used or unsealed containers. Never reuse brake fluid left over from the last servicing or which has been stored for long periods of time.
- When storing brake fluid, seal the container completely and keep it away from children.
- When replenishing brake fluid, take care not to get dust into the fluid.
- When washing brake components, use new brake fluid. Never use cleaning solvent.
- A contaminated brake disc or brake pad reduces braking performance. Discard contaminated pads and clean the disc with high quality brake cleaner or neutral detergent.
! CAUTION Immediately and completely wipe off any brake fluid contacting any part of the motorcycle. The brake fluid reacts chemically with paint, plastics and rubber materials, etc., and will damage them severely.
Schematic and Routing Diagram
Front Brake Hose Routing Diagram
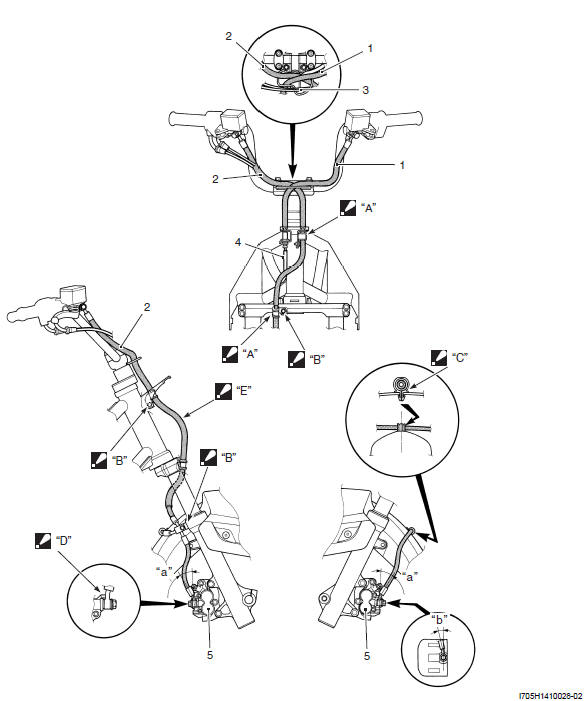
- Rear brake hose
- Front brake hose
- Brake hose guide
- Rear brake pipe
- Front brake caliper
- Fix the brake hose grommet to its hose clamp.
- After touching the clamp to the stopper, tighten the clamp bolt.
- Insert the clamp to the hole of the front fender fully.
- After touching the brake hose union to the stopper, tighten the union bolt to the specified torque.
- Do not bend the brake hose to frame head pipe side.
- 28º
- 14º
Rear Brake Hose Routing Diagram
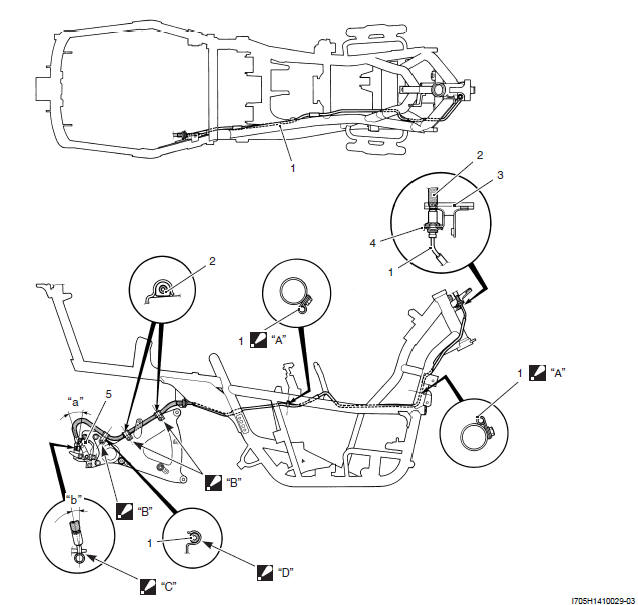
- Rear brake pipe
- Rear brake hose
- Front cowling plate
- E-ring
- Rear brake caliper
- Clamp the rear brake pipe at white mark position.
- positioning the clamp with the stopper on the swingarm, tighten the clamp bolt.
- After touching the brake hose union to the stopper, tighten the union bolt to the specified torque.
- Clamp the brake hose firmly.
- 28º
- 14º
Diagnostic Information and Procedures
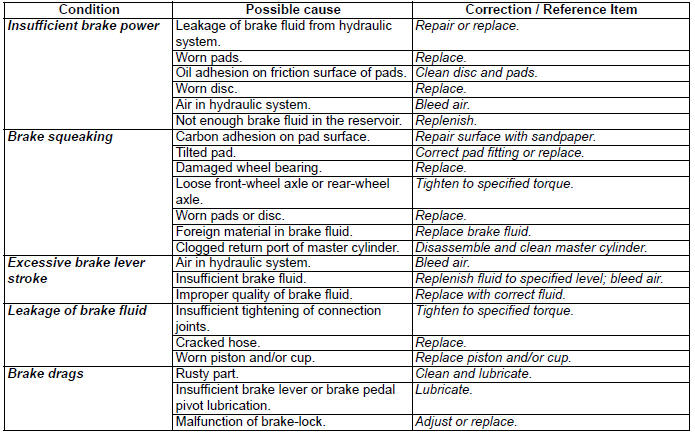
Brake Symptom Diagnosis
See also:
 Suzuki Burgman 400 - Service manual > Repair Instructions
Brake Light Switch Inspection Front Brake Light Switch Inspect the front brake light switch in the following procedures: 1) Remove the handlebar cover. Refer to "Handlebar Cover Removal and Installation".


