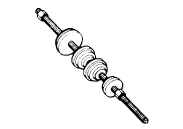
 Suzuki Burgman 400 - Service manual > Crankcase Bracket Construction
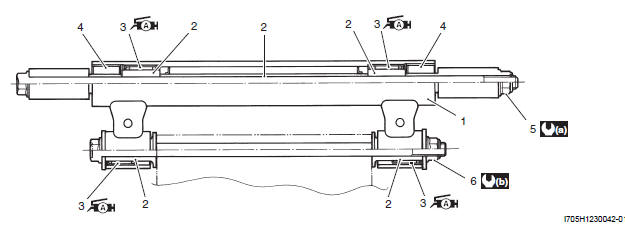
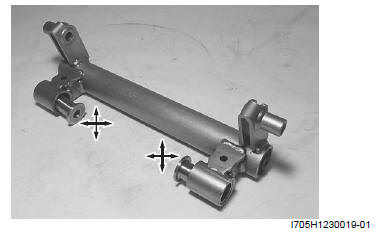
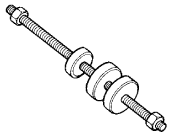
- Crankcase bracket
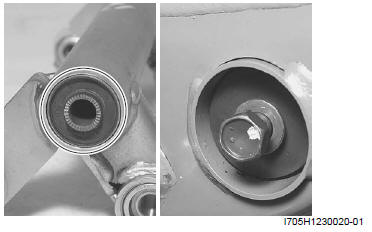
- Spacer
- Bearing
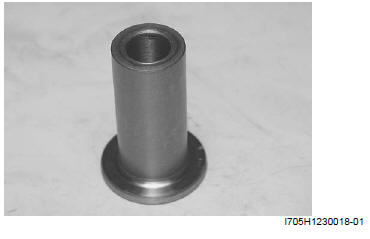
- Bushing
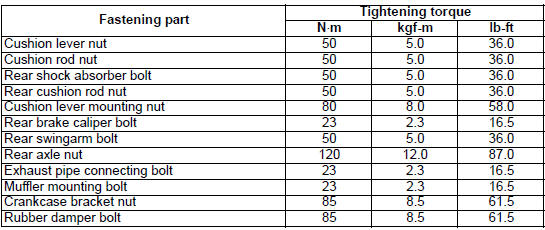
- Crankcase bracket nut
- Engine mounting nut
- : 85 N*m (8.5 kgf-m, 61.5 lb-ft)
- : 93 N*m (9.3 kgf-m, 67.0 lb-ft)
 : Apply grease.
Crankcase Bracket Removal and Installation
Removal
1) Remove the engine.
Refer to "Engine Assembly Removal and Installation".
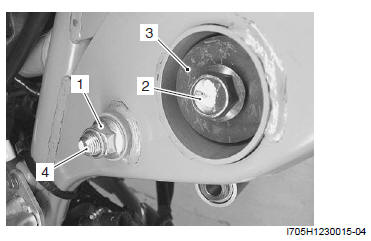
2) Remove the crankcase bracket nut (1) and rubber damper bolts (2) (L & R).
3) Remove the rubber dampers (3) (L & R).
4) Pull out the crankcase bracket bolt (4) and remove the crankcase bracket.
Installation
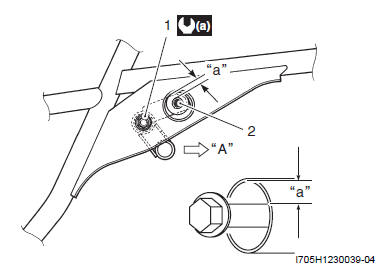
1) Install the crankcase bracket with the bolt and tighten the crankcase bracket nut (1) temporarily.
2) Install the rubber damper bolts (2) temporarily without installing the rubber dampers.
3) Move the crankcase bracket backwards "A" to provide the clearance "a" as shown in the figure.
Clearance "a"
14 mm (0.55 in)
4) With the crankcase bracket held immovable, tighten the crankcase bracket nut (1) to the specified torque.
Tightening torque
Crankcase bracket nut (a): 85 N*m (8.5 kgf-m, 61.5 lb-ft)
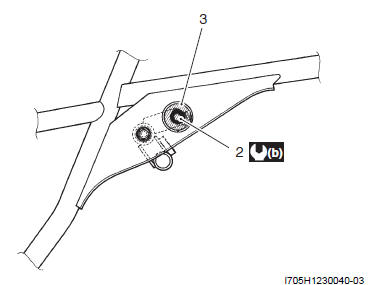
5) Remove the rubber damper bolts (2) (L & R) after tightening the crankcase bracket nut (1).
6) Install the rubber dampers (3) (L & R) and tighten the rubber damper bolts (2) (L & R) to the specified torque.
Tightening torque
Rubber damper bolt (b): 85 N*m (8.5 kgf-m, 61.5 lb-ft)
7) Install the engine.
Refer to "Engine Assembly Removal and Installation".
Crankcase Bracket Related Parts Inspection
Refer to "Crankcase Bracket Removal and Installation".
Spacer
1) Remove the spacers from the crankcase bracket.
2) Inspect the spacers for any flaws or other damage. If any defects are is found, replace the spacers with the new ones.
Bearing
1) Insert the spacers into the bearings.
2) Check the play by moving the spacers up and down.
If excessive play is noted, replace the bearing with a new one. Refer to "Crankcase Bracket Bearing Removal and Installation".
Rubber Parts
Inspect the rubber damper and bushing for crack or other damage. If any defects are is found, replace them with the new ones.
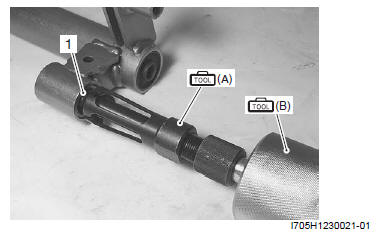
Crankcase Bracket Bearing Removal and Installation
Removal
1) Remove the crankcase bracket. Refer to "Crankcase Bracket Removal and Installation".
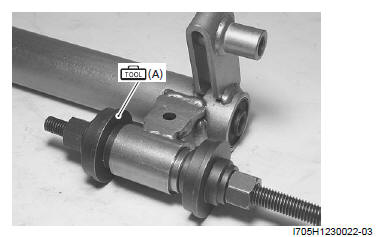
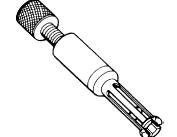
2) Remove the bearing (1) using the special tools.
Special tool
(A): 09923-74511 (Bearing puller)
(B): 09930-30104 (Sliding shaft)
Installation
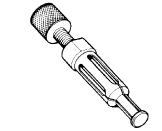
! CAUTION The removed bearings must be replaced with the new ones.
1) Install the bearing using the special tool.
Special tool (A): 09924-84521 (Bearing installer set)
NOTE When installing the bearing, stamped mark on the bearing must face outside.
2) Install the crankcase bracket. Refer to "Crankcase Bracket Removal and Installation ".
Specifications
Service Data
Suspension
Unit: mm (in)

Tightening Torque Specifications
NOTE The specified tightening torque is also described in the following.
Reference: For the tightening torque of fastener not specified in this section, refer to "Tightening Torque Specifications".
Special Tools and Equipment
Recommended Service Material

NOTE Required service material is also described in the following.
Special Tool
 09913-50121
Oil seal remover
09913-50121
Oil seal remover
 09913-70210
Bearing installer set
09913-70210
Bearing installer set
 09923-73210
Bearing remover
09923-73210
Bearing remover
 09923-74511
Bearing puller
09923-74511
Bearing puller
 09924-84521
Bearing installer set
09924-84521
Bearing installer set
 09930-30104
Rotor remover slide shaft
09930-30104
Rotor remover slide shaft
 09941-34513
Steering race installer
09941-34513
Steering race installer
See also:
 Suzuki Burgman 400 - Service manual > Rear Swingarm Related Parts Inspection
Refer to "Rear Swingarm Removal and Installation". Inspect the following parts. Rear Swingarm Inspect the rear swingarm for crack or other damage. If any defects are found, replace the swingarm with a new one.


