 Suzuki Burgman 400 - Service manual > Front Brake Hose Removal and Installation
Removal
1) Remove the front leg shield. Refer to "Front Leg Shield Removal and Installation".
2) Drain brake fluid. Refer to "Brake Fluid Replacement".
3) Remove the front brake hoses. Refer to "Front Brake Hose Routing Diagram".
Installation
! CAUTION The seal washers should be replaced with the new ones to prevent fluid leakage.
1) Install the front brake hose. Refer to "Front Brake Hose Routing Diagram".
2) Bleed air from the front brake system. Refer to "Air Bleeding from Brake Fluid Circuit ".
3) Reinstalled remove the parts.
Rear Brake Hose Removal and Installation
Removal
1) Remove the right foot board. Refer to "Footboard Removal and Installation".
2) Drain brake fluid. Refer to "Brake Fluid Replacement".
3) Remove the rear brake hose. Refer to "Rear Brake Hose Routing Diagram ".
Installation
! CAUTION The seal washers should be replaced with the new ones to prevent fluid leakage.
1) Install the rear brake hose. Refer to "Rear Brake Hose Routing Diagram".
2) Bleed air from the rear brake system. Refer to "Air Bleeding from Brake Fluid Circuit".
3) Reinstalled remove the parts.
Front Brake Master Cylinder Components
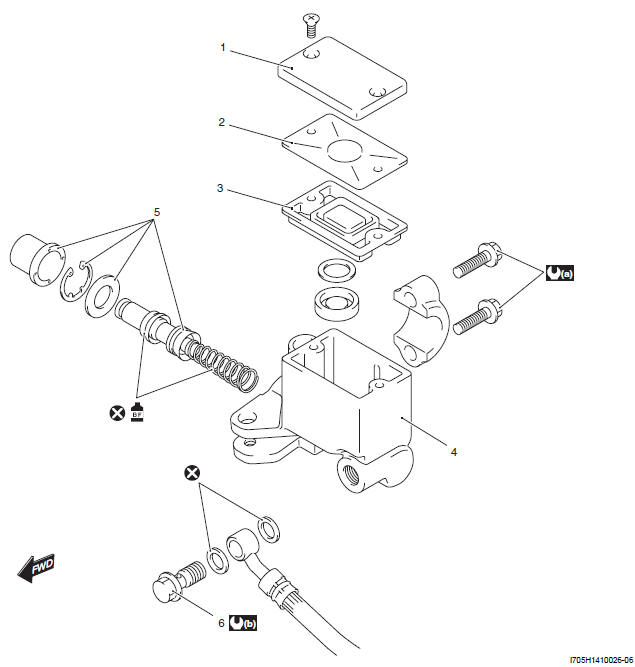
- Reservoir cap
- Plate
- Diaphragm
- Master cylinder
- Piston/Cup set
- Brake hose union bolt
- : 10 N*m (1.0 kgf-m, 7.0 lb-ft)
- : 23 N*m (2.3 kgf-m, 16.5 lb-ft)
 : Apply brake fluid.
 : Do not reuse.
Front Brake Master Cylinder Assembly Removal and Installation
Removal
1) Remove the handlebar cover. Refer to "Handlebar Cover Removal and Installation".
2) Remove the rear view mirror.
3) Drain the brake fluid. Refer to "Brake Fluid Replacement".
4) Disconnect the front brake light switch lead wire couplers (1).
5) Place a rag underneath the union bolt (2) on the master cylinder to catch any split brake fluid.
Remove the brake hose union bolt and disconnect the brake hose.
6) Remove the master cylinder assembly.

Installation
Install the front brake master cylinder in the reverse order of removal. Pay attention to the following points:
- When installing the master cylinder (1) onto the handlebars (2), align the master cylinder holder's mating surface "A" with the punch mark "B" on the handlebars (2) and tighten the upper holder bolt first temporarily to provide clearance on the lower side and then tighten both of the bolts to the specified torque.
Tightening torque
Master cylinder holder bolt (a): 10 N*m (1.0 kgf-m, 7.0 lb-ft)
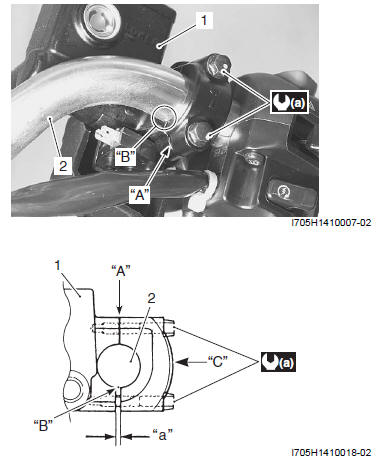
- "Up" mark
- Clearance
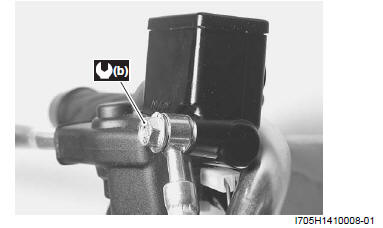
- After setting the brake hose union to the stopper, tighten the union bolt to the specified torque.
! CAUTION The seal washers should be replaced with the new ones to prevent fluid leakage.
Tightening torque
Brake hose union bolt (b): 23 N*m (2.3 kgf-m, 16.5 lb-ft)
Bleed air from the brake system. Refer to "Air Bleeding from Brake Fluid Circuit ".
See also:
 Suzuki Burgman 400 - Service manual > Repair Instructions
Brake Light Switch Inspection Front Brake Light Switch Inspect the front brake light switch in the following procedures: 1) Remove the handlebar cover. Refer to "Handlebar Cover Removal and Installation".
Suzuki Burgman 400 - Service manual > Front Master Cylinder / Brake Lever Disassembly and Assembly
Refer to "Front Brake Master Cylinder Assembly Removal and Installation". Disassembly 1) Remove the dust cover (1), brake lever (2) and brake light switch (3).


