 Yamaha XMAX YP125R - Service manual > Front fork
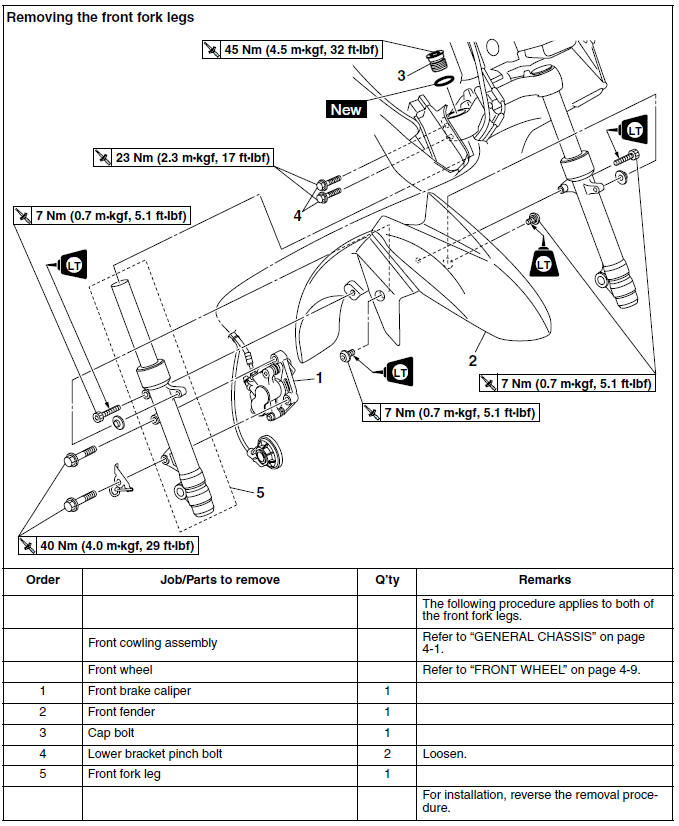
Removing the front fork legs
The following procedure applies to both of the front fork legs.
1. Stand the vehicle on a level surface.
WARNING
Securely support the vehicle so that there is no danger of it falling over.
2. Remove:
- Cap bolt "1"
NOTICE
When removing the cap bolt, take care not to damage the rectifier/regulator "2" with the tools.
TIP
If the cap bolt is difficult to loosen, slightly loosen the lower bracket pinch bolts "3".
3. Loosen:
- Lower bracket pinch bolts
WARNING
Before loosening the lower bracket pinch bolts, support the front fork leg.
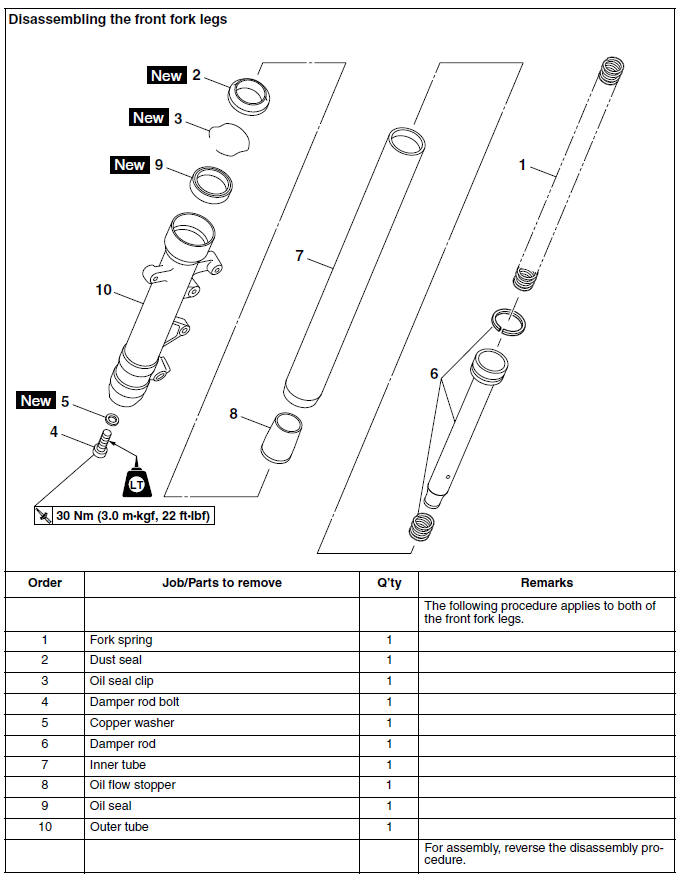
Disassembling the front fork legs
The following procedure applies to both of the front fork legs.
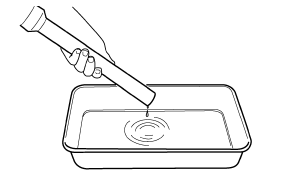
1. Drain:
- Fork oil
TIP
Stroke the inner tube several times while draining the fork oil.
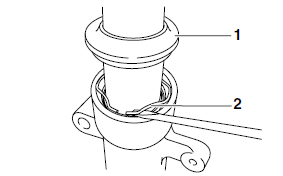
2. Remove:
- Dust seal "1"
- Oil seal clip "2" (with a flat-head screwdriver)
NOTICE
Do not scratch the inner tube.
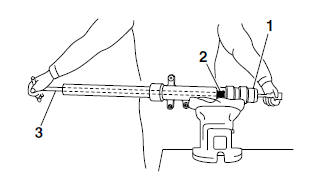
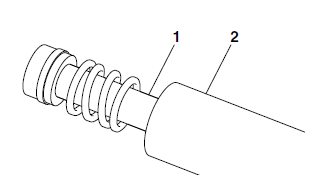
3. Remove:
- Damper rod bolt "1"
- Copper washer
- Damper rod
TIP
While holding the damper rod with the damper rod holder "2" and T-handle "3", loosen the damper rod bolt.
 Damper rod holder
90890-01294
Damper rod holder
90890-01294
Damping rod holder set YM-01300
T-handle 90890-01326
T-handle 3/8" drive 60 cm long YM-01326
Checking the front fork legs
The following procedure applies to both of the front fork legs.
1. Check:
- Inner tube
- Outer tube
Bends/damage/scratches → Replace.
WARNING
Do not attempt to straighten a bent inner tube as this may dangerously weaken it.
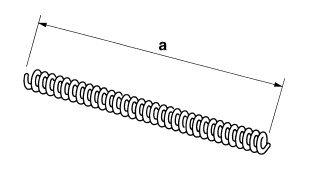
2. Measure:
- Spring free length "a"
Out of specification → Replace.
 Fork spring free length
340.0 mm (13.39 in)
Fork spring free length
340.0 mm (13.39 in)
Limit 333.0 mm (13.11 in)
3. Check:
- Damper rod
Damage/wear → Replace.
Obstruction → Blow out all of the oil passages with compressed air.
- Oil flow stopper
Damage → Replace.
NOTICE
When disassembling and assembling the front fork leg, do not allow any foreign material to enter the front fork.
Assembling the front fork legs
The following procedure applies to both of the front fork legs.
WARNING
- Make sure the oil levels in both front fork legs are equal.
- Uneven oil levels can result in poor handling and a loss of stability.
TIP
When assembling the front fork leg, be sure to replace the following parts:
- Oil seal
- Dust seal
- Clip
Before assembling the front fork leg, make sure all of the components are clean.
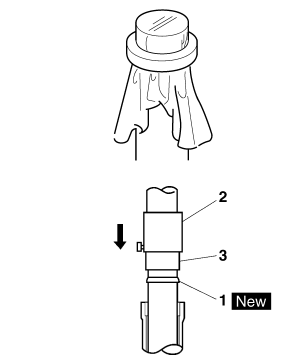
1. Install:
- Damper rod "1"
NOTICE
Allow the damper rod to slide slowly down the inner tube "2" until it protrudes from the bottom of the inner tube. Be careful not to damage the inner tube.
2. Lubricate:
- Inner tube's outer surface
 Recommended oil
Fork oil 10W or equivalent
Recommended oil
Fork oil 10W or equivalent
3. Tighten:
- Damper rod bolt "1"
 Damper rod bolt
30 Nm (3.0 m*kgf, 22 ft*lbf)
LOCTITE
Damper rod bolt
30 Nm (3.0 m*kgf, 22 ft*lbf)
LOCTITE
TIP
While holding the damper rod with the damper rod holder "2" and T-handle "3", tighten the damper rod bolt.
 Damper rod holder
90890-01294
Damper rod holder
90890-01294
Damping rod holder set YM-01300
T-handle 90890-01326
T-handle 3/8" drive 60 cm long YM-01326

4. Install:
- Oil seal "1"
 (with the fork
seal driver weight "2" and fork
seal driver attachment "3")
(with the fork
seal driver weight "2" and fork
seal driver attachment "3")
 Fork seal driver weight
90890-01367
Fork seal driver weight
90890-01367
Replacement hammer YM-A9409-7
Fork seal driver attachment (ø38) 90890-01372
Replacement 38 mm YM-A5142-1
NOTICE
Make sure the numbered side of the oil seal faces up.
TIP
- Before installing the oil seal, lubricate its lips with lithium-soap-based grease.
- Lubricate the outer surface of the inner tube with fork oil.
- Before installing the oil seal, cover the top of the front fork leg with a plastic bag to protect the oil seal during installation.
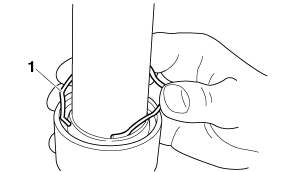
5. Install:
- Oil seal clip "1"
TIP
Adjust the oil seal clip so that it fits into the outer tube's groove.
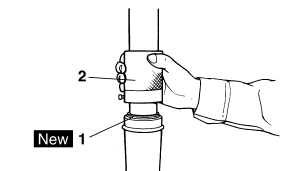
6. Install:
- Dust seal "1"

(with the fork seal driver weight "2")
 Fork seal driver weight
90890-01367
Fork seal driver weight
90890-01367
Replacement hammer YM-A9409-7
7. Fill:
- Front fork leg (with the specified amount of the recommended fork oil)
 Recommended oil
Fork oil 10W or equivalent
Recommended oil
Fork oil 10W or equivalent
Quantity 128.0 cm³ (4.33 US oz, 4.51 Imp.oz)
NOTICE
- Be sure to use the recommended fork oil.
Other oils may have an adverse effect on front fork performance.
- When disassembling and assembling the front fork leg, do not allow any foreign material to enter the front fork.
8. After filling the front fork leg, slowly stroke the inner tube "1" up and down (at least ten times) to distribute the fork oil.
TIP
Be sure to stroke the inner tube slowly because the fork oil may spurt out.
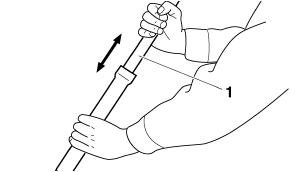
9. Before measuring the fork oil level, wait ten minutes until the oil has settled and the air bubbles have dispersed.
TIP
Be sure to bleed the front fork leg of any residual air.
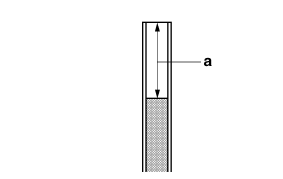
10.Measure:
- Front fork leg oil level "a" (from the top of the inner tube, with the inner tube fully compressed and without the fork spring)
Out of specification → Correct.
 Level
109.0 mm (4.29 in)
Level
109.0 mm (4.29 in)
11.Install:
- Fork spring
Installing the front fork legs
The following procedure applies to both of the front fork legs.
1. Install:
- Front fork leg "1"
WARNING
Make sure the brake hose is routed properly.
TIP
Pull up the inner tube until it stops, and then tighten the lower bracket pinch bolts.
 Lower bracket pinch bolt
23 Nm (2.3 m*kgf, 17 ft*lbf)
Lower bracket pinch bolt
23 Nm (2.3 m*kgf, 17 ft*lbf)
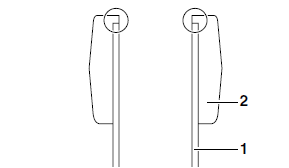
2. Lower bracket
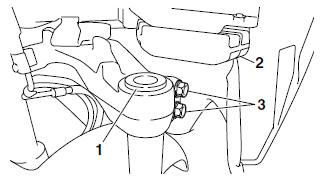
2. Install:
- Cap bolt
(along with the O-ring  )
)
 Cap bolt
45 Nm (4.5 m*kgf, 32 ft*lbf)
Cap bolt
45 Nm (4.5 m*kgf, 32 ft*lbf)
NOTICE
When installing the cap bolt, take care not to damage the rectifier/regulator with the tools.
TIP
- Before installing the cap bolt, lubricate its Oring with grease.
- If the cap bolt is difficult to install, slightly loosen the lower bracket pinch bolts.
See also:
 Yamaha XMAX YP125R - Service manual > Handlebar
Removing the handlebar Removing the handlebar
Yamaha XMAX YP125R - Service manual > Steering head
Removing the lower bracket Removing the lower bracket


