 Yamaha XMAX YP125R - Service manual > Steering head
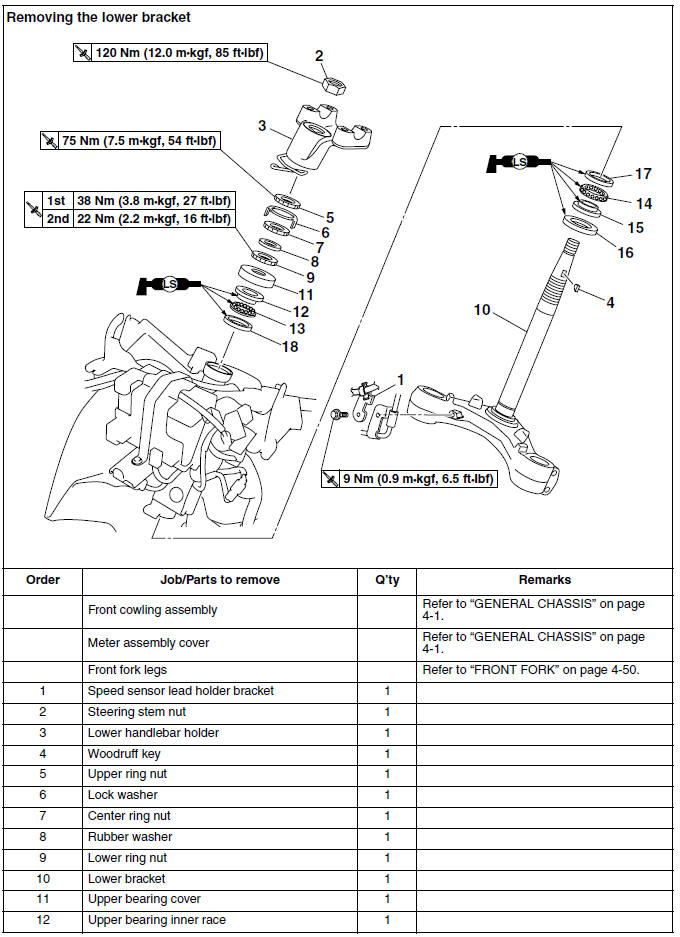
Removing the lower bracket
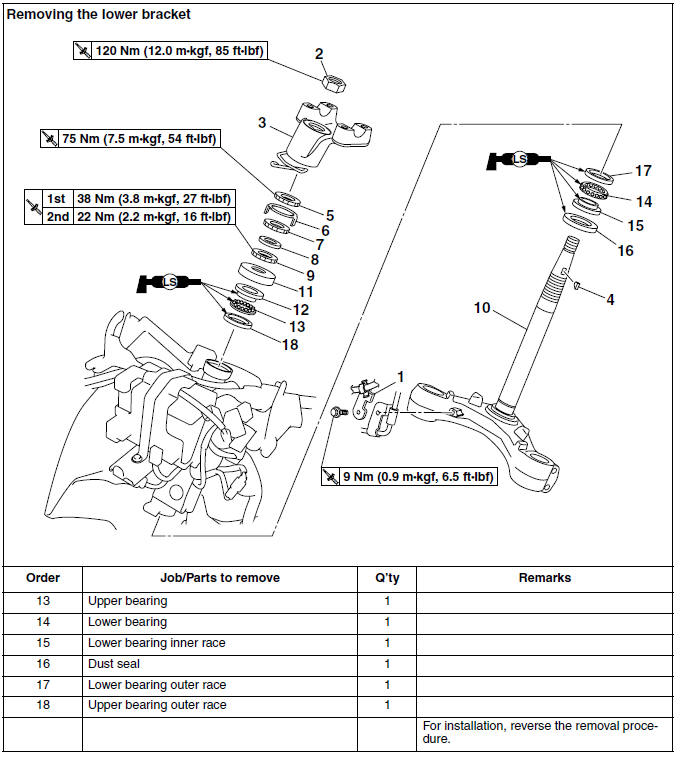
Removing the lower bracket
Removing the lower bracket
1. Stand the vehicle on a level surface.
WARNING
Securely support the vehicle so that there is no danger of it falling over.
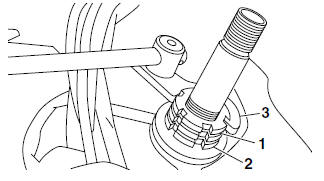
2. Remove:
- Upper ring nut "1"
- Lock washer
- Center ring nut
- Rubber washer
- Lower ring nut "2"
- Lower bracket
WARNING
Securely support the lower bracket so that there is no danger of it falling.
TIP
Remove the upper ring nut and lower ring nut with the steering nut wrench "3".
 Steering nut wrench
90890-01403
Steering nut wrench
90890-01403
Exhaust flange nut wrench YU-A9472
Checking the steering head
1. Wash:
- Bearings
- Bearing races
 Recommended cleaning solvent
Kerosene
Recommended cleaning solvent
Kerosene
2. Check:
- Bearings
- Bearing races
Damage/pitting → Replace.
3. Replace:
- Bearings
- Bearing races
a. Remove the bearing races from the steering head pipe "1" with a long rod "2" and hammer.
b. Remove the bearing race from the lower bracket "3" with a floor chisel "4" and hammer.
c. Install new bearing races.
NOTICE
If the bearing race is not installed properly, the steering head pipe could be damaged.
TIP
Always replace the bearings and bearing races as a set.
4. Check:
- Lower handlebar holder
- Lower bracket (along with the steering stem)
Bends/cracks/damage → Replace.
Installing the steering head
1. Lubricate:
- Upper bearing
- Lower bearing
- Bearing races
 Recommended lubricant
Lithium-soap-based grease
Recommended lubricant
Lithium-soap-based grease
2. Install:
- Lower ring nut "1"
- Rubber washer
- Center ring nut "2"
- Lock washer "3"
- Upper ring nut "4"
3. Install:
- Woodruff key "1"
- Lower handlebar holder "2"
- Steering stem nut
 Steering stem nut
120 Nm (12.0 m*kgf, 85 ft*lbf)
Steering stem nut
120 Nm (12.0 m*kgf, 85 ft*lbf)
TIP
Align the woodruff key with the groove "a" in the lower handlebar holder.
See also:
 Yamaha XMAX YP125R - Service manual > Rear shock absorber assemblies and swingarm
Removing the rear shock absorber assemblies and swingarm (YP125R) Removing the rear shock absorber assemblies and swingarm (YP250R)


