 Yamaha XMAX YP125R - Service manual > Measuring the compression pressure
TIP
Insufficient compression pressure will result in a loss of performance.
1. Remove:
- Storage box
2. Measure:
- Valve clearance
Out of specification → Adjust.
3. Start the engine, warm it up for several minutes, and then turn it off.
4. Disconnect:
- Spark plug cap
5. Remove:
- Spark plug
NOTICE
Before removing the spark plug, use compressed air to blow away any dirt accumulated in the spark plug well to prevent it from falling into the cylinder.
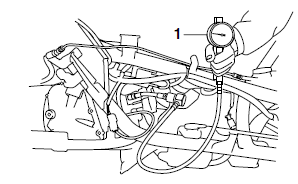
6. Install:
- Compression gauge "1"
 Compression gauge
90890-03081
Compression gauge
90890-03081
Engine compression tester YU-33223
7. Measure:
- Compression pressure
Out of specification → Refer to steps (c) and (d).
 Standard
compression pressure
(at sea level)
Standard
compression pressure
(at sea level)
550 kPa/680 r/min (5.5 kgf/cm²/680 r/min, 78.2 psi/680 r/min)
Minimum-maximum 480-620 kPa (4.8-6.2 kgf/cm², 68.3-88.2 psi)
a. Set the main switch to "ON".
b. With the throttle wide open, crank the engine until the reading on the compression gauge stabilizes.
WARNING
To prevent sparking, ground the spark plug lead before cranking the engine.
c. If the compression pressure is above the maximum specification, check the cylinder head, valve surfaces and piston crown for carbon deposits.
Carbon deposits → Eliminate.
d. If the compression pressure is below the minimum specification, pour a teaspoonful of engine oil into the spark plug bore and measure again.
Refer to the following table. 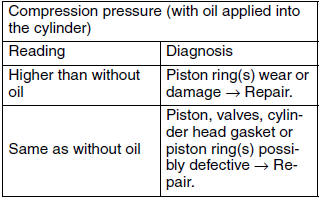
8. Install:
- Spark plug
 Spark plug
13 Nm (1.3 m*kgf, 9.4 ft*lbf)
Spark plug
13 Nm (1.3 m*kgf, 9.4 ft*lbf)
9. Connect:
- Spark plug cap
10.Install:
- Storage box
Checking the engine oil level
1. Stand the vehicle on a level surface.
TIP
- Place the vehicle on the centerstand.
- Make sure the vehicle is upright.
2. Start the engine, warm it up for several minutes, and then turn it off.
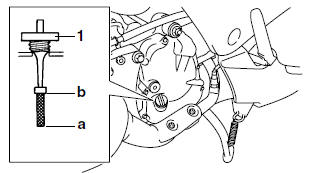
3. Remove:
- Dipstick "1"
4. Check:
- Engine oil level
The engine oil level should be between the minimum level mark "a" and maximum level mark "b".
Below the minimum level mark → Add the recommended engine oil to the proper level.
TIP
- Before checking the engine oil level, wait a few minutes until the oil has settled.
- Do not screw the dipstick in when inspecting the oil level.
 Type
Type
SAE 10W-30, SAE 10W-40, SAE 15W-40, SAE 20W-40 or SAE 20W-50
Recommended engine oil grade API service SG type or higher, JASO standard MA

NOTICE
Do not allow foreign materials to enter the crankcase.
5. Start the engine, warm it up for several minutes, and then turn it off.
6. Check the engine oil level again.
TIP
Before checking the engine oil level, wait a few minutes until the oil has settled.
7. Install:
- Dipstick
Changing the engine oil
1. Start the engine, warm it up for several minutes, and then turn it off.
2. Place a container under the engine oil drain bolt.
3. Remove:
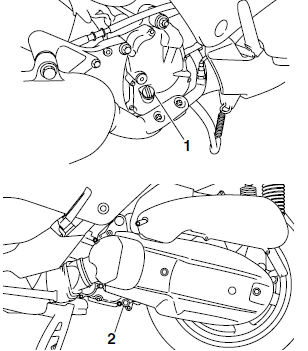
- Engine oil filler cap "1"
- Engine oil drain bolt "2" (along with the gasket)
4. Drain:
- Engine oil (completely from the crankcase)
5. If the oil filter element is also to be replaced, perform the following procedure.
a. Remove the oil filter element cover "1" and oil filter element "2".
b. Install a new O-ring "3".
TIP
Be sure to face the " " mark "a"
on the oil filter
element cover in the direction shown in the illustration.
" mark "a"
on the oil filter
element cover in the direction shown in the illustration.
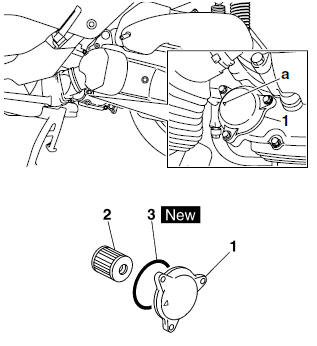
c. Install the new oil filter element and the oil filter element cover.
 Oil filter element cover bolt
10 Nm (1.0 m*kgf, 7.2 ft*lbf)
Oil filter element cover bolt
10 Nm (1.0 m*kgf, 7.2 ft*lbf)
6. If the oil strainer is also to be cleaned, perform the following procedure.
a. Remove the oil strainer cover "1" and oil strainer "2".
b. Install a new O-ring "3".
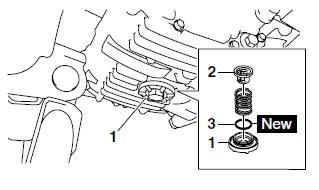
c. Install the oil strainer cover.
 Oil strainer cover
32 Nm (3.2 m*kgf, 23 ft*lbf)
Oil strainer cover
32 Nm (3.2 m*kgf, 23 ft*lbf)
7. Install:
- Engine oil drain bolt
(along with the gasket  )
)
 Engine oil drain bolt
20 Nm (2.0 m*kgf, 14 ft*lbf)
Engine oil drain bolt
20 Nm (2.0 m*kgf, 14 ft*lbf)
8. Fill:
- Crankcase (with the specified amount of the recommended engine oil)
 Engine oil
quantity
Engine oil
quantity
Total amount 1.60 L (1.69 US qt, 1.41 Imp.qt)
Without oil filter element replacement 1.40 L (1.48 US qt, 1.23 Imp.qt)
With oil filter element replacement 1.50 L (1.59 US qt, 1.32 Imp.qt)
9. Install:
- Engine oil filler cap
10.Start the engine, warm it up for several minutes, and then turn it off.
11.Check:
- Engine (for engine oil leaks)
12.Check:
- Engine oil level
13.Check:
- Engine oil pressure
a. Slightly loosen the oil check bolt "1".
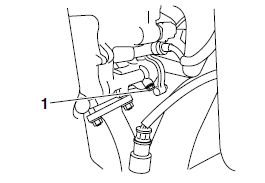
b. Start the engine and keep it idling until engine oil starts to seep from the oil check bolt. If no engine oil comes out after one minute, turn the engine off so that it will not seize.
c. Check the engine oil passages and the oil pump for damage or leakage.
d. Start the engine after solving the problem(s) and check the engine oil pressure again.
e. Tighten the oil check bolt to specification.
 Oil check bolt
7 Nm (0.7 m*kgf, 5.1 ft*lbf)
Oil check bolt
7 Nm (0.7 m*kgf, 5.1 ft*lbf)
14.Reset:
- Oil change indicator
a. Set the main switch to "ON".
b. Push the "OIL CHANGE" button "1" for 15 to 20 seconds.
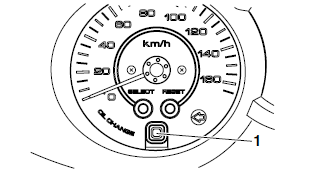
c. Release the button and the oil change indicator will go off.
TIP
If the engine oil is changed before the oil change indicator comes on (i.e., before the periodic oil change interval has been reached), the oil change indicator must be reset as soon as possible so that it comes on for the next periodic oil change.
See also:
 Yamaha XMAX YP125R - Service manual > Adjusting the valve clearance
The following procedure applies to all of the valves. TIP Valve clearance adjustment should be made on a cold engine, at room temperature. When the valve clearance is to be measured or adjusted, the piston must be at top dead center (TDC) on the compression stroke.
Yamaha XMAX YP125R - Service manual > Changing the final transmission oil
1. Stand the vehicle on a level surface. TIP Place the vehicle on the centerstand. Make sure that the vehicle is upright. 2. Start the engine, warm it up for several minutes, and then turn it off.


