 PIAGGIO Beverly 300ie - Owner's Manual > Rear optical unit
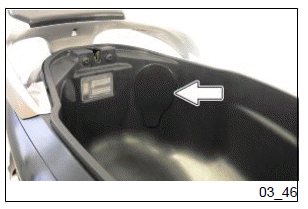
To replace the indicator bulbs proceed as follows:
- Open the saddle
- Remove the rubber protection
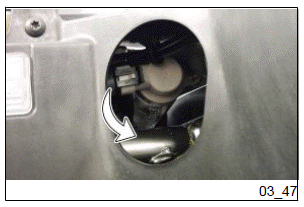
- Remove the lamp holder turning it towards the base
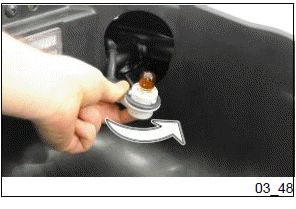
- Lightly press the lamp and turn it anticlockwise and remove it.
WARNING
THE DAYLIGHT RUNNING LIGHTS PRESENT IN THE SAME GROUP ARE "LED" TYPES. IN CASE OF MALFUNCTIONING, AS THE REMOVAL IS PARTICULARLY DIFFICULT, WE ADVISE ADDRESSING AN Authorised PIAGGIO Service Centre FOR THE REPLACEMENT.
Number plate light
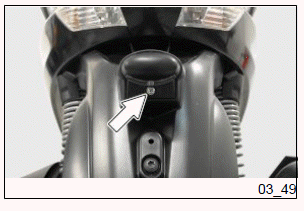
Unscrew the indicated screw and then take out the lamp holder.
CAUTION
DO NOT PULL THE ELECTRICAL WIRING TO EXTRACT THE BULB HOLDER.
Helmet compartment lighting bulb

Open the helmet compartment, take out the snap-on transparent glass and replace the bulb.
Rear-view mirrors
Adjust the mirrors by applying slight pressure to the side of the mirror to move it to the desired position.
Front and rear disc brake

The brake disc and pad wear is automatically compensated, therefore it has no effect on the functioning of the front and rear brakes. For this reason it is not necessary to adjust the brakes. An excessively elastic brake lever stroke may indicate the presence of air in the braking circuit or a failure in the braking system. In this case, mainly due to the importance of brakes to guarantee safe riding conditions, the vehicle should be taken to an Authorised Service Centre or Dealer.
CAUTION
BRAKING SHOULD BEGIN AFTER ABOUT 1/3 OF THE BRAKE LEVER STROKE.
CAUTION
HAVE THE BRAKE PADS CHECKED BY THE DEALER ACCORDING TO THE CHECKS SPECIFIED IN THE SCHEDULED MAINTENANCE TABLE. HOWEVER, IN THE EVENT OF NOISES COMING FROM THE FRONT AND/OR REAR BRAKING SYSTEM DURING OPERATION, IT IS ADVISABLE TO HAVE THE BRAKING SYSTEM CHECKED BY AN AUTHORISED SERVICE CENTRE OR DEALER. AFTER REPLACING THE BRAKE PADS, DO NOT USE THE SCOOTER UNTIL YOU HAVE OPERATED THE BRAKE LEVER SEVERAL TIMES IN ORDER TO ALLOW THE PLUNGERS TO SETTLE AND THE LEVER STROKE TO BE SET TO THE CORRECT POSITION.
CAUTION
THE PRESENCE OF SAND, MUD, SNOW MIXED WITH SALT, ETC. ON THE ROAD, CAN DRASTICALLY REDUCE THE LIFE OF THE BRAKE PADS. IN ORDER TO AVOID THIS, WE RECOMMEND WASHING THE VEHICLE FREQUENTLY WHEN RIDING IN THESE ROAD CONDITIONS.
Puncture
The vehicle is equipped with Tubeless tyres (without inner tube). In the event of a puncture, Tubeless tyres - unlike tyres with inner tubes - go flat very slowly, resulting in a greater steering safety. In the event of a puncture, an emergency repair can be carried out using an "inflate and repair" spray can. For a final repair, take your vehicle to an Authorised Service Centre or Dealer. The replacement of a tyre involves removing the wheel in question. Take your vehicle to an Authorised Service Centre or Dealer for these operations.
CAUTION
TO USE THE "INFLATE AND REPAIR" SPRAY CAN PROPERLY, FOLLOW THE INSTRUCTIONS ON THE PACKAGING.
WARNING
THE WHEELS FITTED WITH TYRES SHOULD ALWAYS BE BALANCED. RIDING THE VEHICLE WITH VERY LOW TYRE PRESSURE OR WITH INCORRECTLY BALANCED TYRES CAN LEAD TO DANGEROUS STEERING VIBRATIONS.
Periods of inactivity
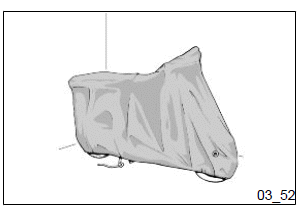
We recommend carrying out the following operations:
1. Clean the vehicle thoroughly and then cover it with a canvas;
2. With the engine off and the piston in the bottom dead centre position, remove the spark plug, and pour into its hole 1 t0 2 cc of the recommended oil. Operate the starter button 1-2 times for roughly 1 second to turn the engine over slowly, then insert the spark plug again;
3. Ensure that the fuel tank is at least half full (in order to ensure the total immersion of the fuel pump); spread antirust grease on the unpainted metal parts; keep the wheels lifted above the ground by resting the chassis on two wooden wedges;
4. As regards the battery, follow the instructions in the "Battery" section.
Recommended products
AGIP CITY HI TEC 4T
Oil to lubricate flexible transmissions (throttle control)
Oil for 4-stroke engines
Cleaning the vehicle
Use a low pressure jet of water to soften the caked dirt and mud deposited on the painted surfaces. Once softened, sponge off mud and dirt using a car body sponge soaked in a car body shampoo and water solution (2-4% of car shampoo in water).
Then rinse with abundant water, and dry with a shammy cloth. For the engine exterior, use petrol, a brush and clean cloths. Petrol can damage paintwork. Remember that any polishing with silicone wax must always be preceded by washing.
CAUTION
DETERGENTS CAN POLLUTE WATER. THE VEHICLE MUST BE WASHED AT A WASH STATION EQUIPPED WITH A SPECIAL WATER PURIFICATION SYSTEM.
CAUTION
DO NOT USE A HIGH-PRESSURE WATER JET MACHINE TO CLEAN THE ENGINE AND/OR VEHICLE; HOWEVER, IF NO OTHER MEANS ARE AVAILABLE, IT IS THEN NECESSARY TO:
- ONLY USE A FANLIKE SPRAY JET.
- DO NOT PLACE THE NOZZLE CLOSER THAN 60 CM.
- DO NOT USE WATER AT TEMPERATURES OVER 40ºC.
- DO NOT USE HIGH-PRESSURE WATER JETS.
- DO NOT STEAM WASH.
- DO NOT AIM THE JET AT: THE ENGINE, THE WIRING, THE COOLING SLITS ON THE TRANSMISSION OR SCROLL COVERS.
CAUTION
NEVER WASH THE SCOOTER IN DIRECT SUNLIGHT, ESPECIALLY IN SUMMER WHEN THE BODYWORK IS STILL HOT AS THE SHAMPOO COULD DAMAGE THE PAINTWORK IF IT DRIES BEFORE BEING RINSED OFF. NEVER USE CLOTHS SOAKED IN ALCOHOL, PETROL, DIESEL OIL OR KEROSENE FOR CLEANING THE PAINTED OR PLASTIC SURFACES, IN ORDER NOT TO DAMAGE THE LUSTRE FINISH OR ALTER THEIR MECHANICAL PROPERTIES. USING SILICONE-BASED WAX CAN DAMAGE THE PAINTED SURFACES, DEPENDING ON THE VEHICLE COLOUR (SATIN COLOURS). FOR FURTHER INFORMATION ON THIS MATTER, CONTACT AN AUTHORISED SERVICE CENTRE.
WARNING
CLEAN YOUR SCOOTER FREQUENTLY SO AS TO AVOID POSSIBLE DIRT OR MUD DEPOSITS THAT COULD CAUSE MALFUNCTIONING IN THE THROTTLE GRIP TRANSMISSION AND/OR OTHER COMPONENTS.
Troubleshooting
STARTING FAILURE
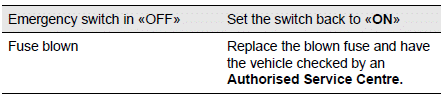
STARTING DIFFICULTIES (SEE "START-UP PROBLEMS" SECTION)


* IMPORTANT: DO NOT USE THE SCOOTER TO THE COMPLETE EXHAUSTION OF FUEL; SHOULD THIS OCCUR, DO NOT ATTEMPT TO START THE ENGINE. TURN THE IGNITION KEY TO "OFF" AND TOP-UP THE FUEL TANK AS SOON AS POSSIBLE.
FAILURE TO FOLLOW THESE GUIDELINES COULD DAMAGE THE FUEL PUMP AND/OR THE CATALYTIC CONVERTER.
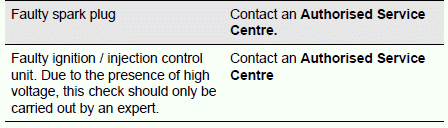
IGNITION PROBLEMS
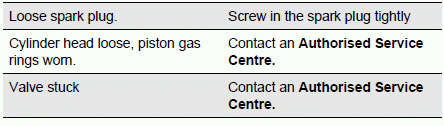
LACK OF COMPRESSION
HIGH CONSUMPTION AND LOW PERFORMANCE

INSUFFICIENT BRAKING

INEFFICIENT SUSPENSION

AUTOMATIC TRANSMISSION PROBLEMS

See also:
 PIAGGIO Beverly 300ie - Owner's Manual > Front light group
To remove the front headlight assembly, proceed as follows: Unscrew the two screws "A" and remove the pressure covering Unscrew the two upper screws "E" fastening the headlight assembly Working on both sides of the vehicle, unscrew the lower fixing screws "C" and remove the headlight. Remove the rubber protection.
PIAGGIO Beverly 300ie - Owner's Manual > Technical Data, Spare Parts and Accessories
Technical Data ENGINE TECHNICAL DATA


