 Suzuki Burgman 400 - Service manual > Rear Shock Absorber Inspection
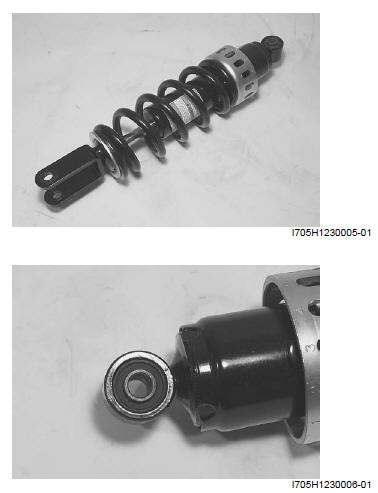
Inspect the rear shock absorber in the following procedures:
1) Remove the rear shock absorber. Refer to "Rear Shock Absorber and Rear Shock Absorber Assembly Removal and Installation".
2) Inspect the rear shock absorber for oil leakage.
3) Inspect the bushing for play and damage.
4) Inspect the rear shock absorber spring for crack or other damage. If any defects are found, replace the shock absorber with a new one.
! CAUTION Do not attempt to disassemble the rear shock absorber. It is unserviceable.
5) Install the rear shock absorber. Refer to "Rear Shock Absorber and Rear Shock Absorber Assembly Removal and Installation".
Rear Shock Absorber Gas Pressure Release
Refer to "Rear Shock Absorber and Rear Shock Absorber Assembly Removal and Installation".
! WARNING The rear shock absorber unit contains high-pressure nitrogen gas. Mishandling can cause explosion.
- Keep away from fire and heat. High gas pressure caused by heat can cause an explosion.
- Release gas pressure before disposing.
Gas Pressure Release
Make sure to observe the following precautions.
! WARNING
- Never apply heat or disassemble the damper unit since it can explode or oil can splash hazardously.
- When discarding the rear shock absorber, be sure to release gas pressure from the rear shock absorber following the procedures.
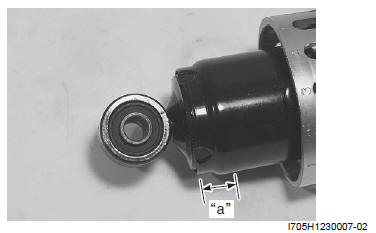
1) Mark the drill hole at position "a" shown in the illustration, with a center punch.
Length "a"
15 mm
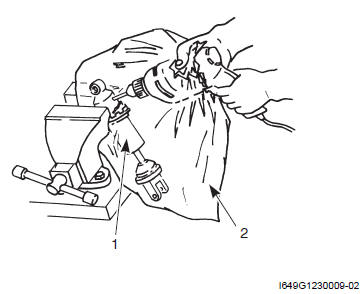
2) Wrap rear shock absorber (1) with a vinyl bag (2) and fix it on a vise as shown.
3) Drill a 2 - 3 mm (0.08 - 0.12 in) hole at the marked drill center using a drilling machine and let out gas while taking care not to get the vinyl bag entangled with the drill bit.
! WARNING
- Be sure to wear protective glasses since drilling chips and oil may fly off with blowing gas when the drill bit has penetrated through the body.
- Make sure to drill at the specified position.
Otherwise, pressurized oil many spout out forcefully.
Rear Suspension Adjustment
After installing the rear suspension, adjust the spring pre-load as follows.
Spring Pre-load Adjustment
1) Keep the motorcycle upright with the center stand.
2) Remove the adjuster cover.
3) Turn the spring tension ring to the desired position.
- Cover
- Adjuster
! CAUTION Position "1" provides the softest spring tension and position "7" provides the stiffest.
STD position
Position "3"
Rear Swingarm Removal and Installation
Removal
1) Raise the rear wheel resting center-stand and using jack.
! CAUTION Fix the frame to be stabilized.
2) Remove the muffler. Refer to "Exhaust Pipe / Muffler Removal and Installation".
3) Loosen the rear axle nut (1) while depressing the rear brake pedal.
4) Remove the rear brake hose clamps (2) and rear brake caliper (3).
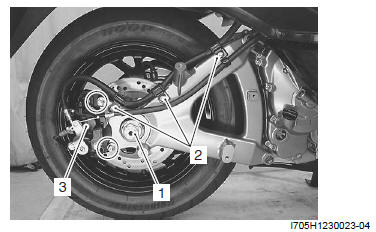
5) Remove the rear swingarm (4) by removing the rear swingarm mounting bolts (5) and rear axle nut.
! CAUTION Do not operating the rear brake lever and brake-lock lever with the rear brake caliper removed.
6) Remove the collar from the swingarm.
Installation
Install the rear swingarm in the reverse order of removal.
Pay attention to the following points:
- Install the collar to swingarm.
! CAUTION When installing the swingarm to the frame, pay attention to the difference of the collar.
- Rear axle nut side
- Wheel side
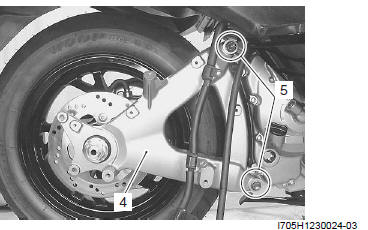
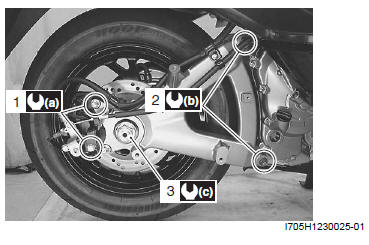
- After install the rear swingarm temporarily, tighten the rear brake caliper bolts (1) to the specified torque.
Tightening torque
Rear brake caliper bolt (a): 23 N*m (2.3 kgf-m, 16.5 lb-ft)
- Tighten the rear swingarm bolts (2), rear axle nut (3) to the specified torque.
Tightening torque
Rear swingarm bolt (b): 50 N*m (5.0 kgf-m, 36.0 lb-ft)
Rear axle nut (c): 120 N*m (12.0 kgf-m, 87.0 lb-ft)
- Tighten the exhaust pipe joint bolt and muffler mounting bolt. to the specified torque.
CAUTION Replace the exhaust pipe connector with a new one.
Tightening torque
Exhaust pipe connecting bolt: 23 N*m (2.3 kgf-m, 16.5 lb-ft)
Muffler mounting bolt: 23 N*m (2.3 kgf-m, 16.5 lb-ft)
! WARNING After remounting the rear wheel, pump the rear brake lever several times to check for proper brake operation.
See also:
 Suzuki Burgman 400 - Service manual > Repair Instructions
Rear Suspension Components Rear shock absorber bolt Rear shock absorber Cushion lever bolt Cushion lever nut Cushion lever bolt Spacer Bearing Cushion lever Cushion lever nut Cushion lever rod bolt Cushion lever rod nut Cushion lever rod Cushion lever rod bolt Cushion lever rod nut : 50 N*m (5.0 kgf-m, 36.0 lb-ft) : 50 N*m (5.0 kgf-m, 36.0 lb-ft) : 80 N*m (8.0 kgf-m, 58.0 lb-ft) : 50 N*m (5.0 kgf-m, 36.0 lb-ft) : 50 N*m (5.0 kgf-m, 36.0 lb-ft)
Suzuki Burgman 400 - Service manual > Rear Swingarm Related Parts Inspection
Refer to "Rear Swingarm Removal and Installation". Inspect the following parts. Rear Swingarm Inspect the rear swingarm for crack or other damage. If any defects are found, replace the swingarm with a new one.


