 Suzuki Burgman 400 - Service manual > Repair Instructions
Rear Brake Components
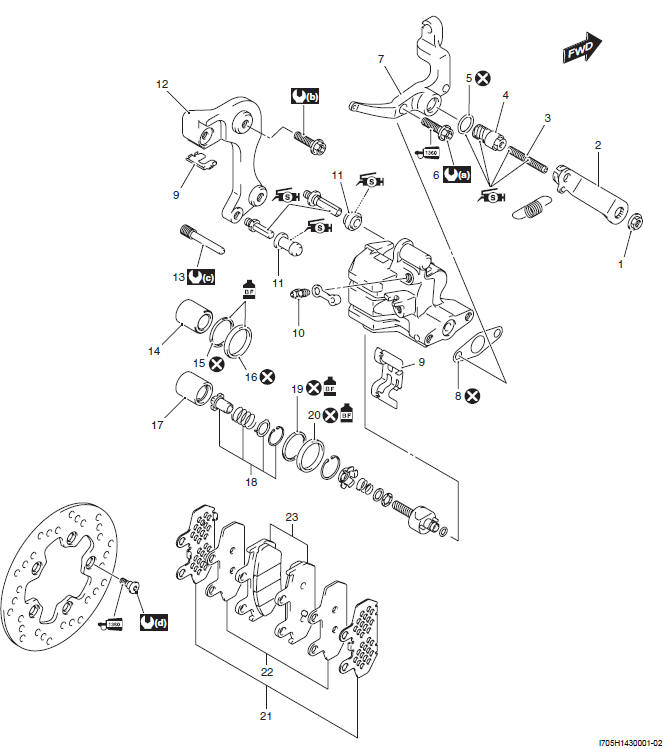
- Lock-nut
- Arm
- Adjuster
- Brake-lock shaft
- O-ring
- Brake-lock housing bolt
- Brake-lock housing
- Gasket
- Pad spring
- Air bleeder valve
- Boot
- Bracket
- Pad mounting pin
- Piston (Upper side)
- Dust seal
- Piston seal
- Piston (Lower side)
- Piston set
- Dust seal
- Piston seal
- Back plate
- Shim
- Brake pad
- : 22 N*m (2.2 kgf-m, 16.0 lb-ft)
- : 23 N*m (2.3 kgf-m, 16.5 lb-ft)
- : 18 N*m (1.8 kgf-m, 13.0 lb-ft)
- : 23 N*m (2.3 kgf-m, 16.5 lb-ft)
 : Apply silicone
grease to sliding surface.
: Apply silicone
grease to sliding surface.
 : Apply thread lock
to thread part.
: Apply thread lock
to thread part.
 : Apply brake fluid.
 : Do not reuse.
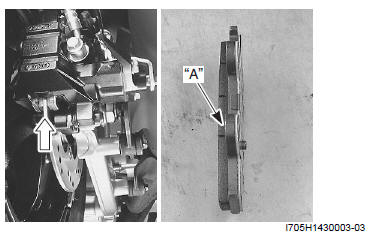
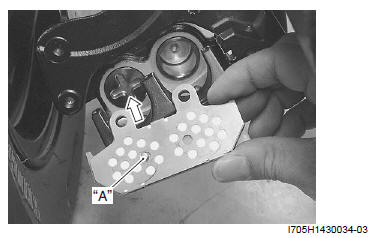
Rear Brake Pad Inspection
The extent of brake pad wear can be checked by observing the grooved limit line "A" on the pad. When the wear exceeds the grooved limit line, replace the pads with the new ones. Refer to "Rear Brake Pad Replacement".
! CAUTION Replace the brake pad as a set, otherwise braking performance will be adversely affected.
Rear Brake Pad Replacement
Replace the rear brake pad in the following procedures:
! CAUTION Do not operate the brake lever and brake-lock lever while dismounting the caliper.
Refer to "Rear Brake Components".
1) Remove the caliper mounting bolts (1).

2) Remove the pad pins (2) and brake pads (3).

3) Clean up the caliper especially around the pistons.
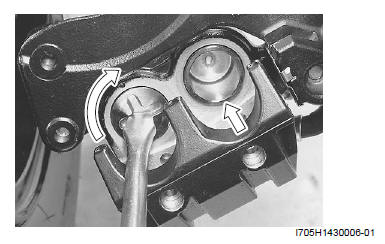
4) With the caliper piston (front side) pushed back into the caliper, force the other caliper piston (rear side) also into the caliper by turning it clockwise.
! CAUTION When pushing on the caliper piston (rear side), keep holding the caliper piston (front side) securely to prevent it from coming out.
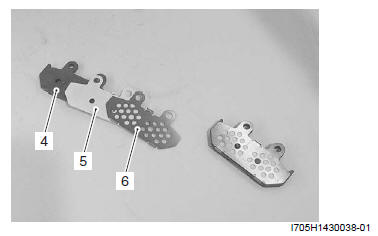
5) Assemble the new pads (4), shims (5) and back plates (6).
! CAUTION Replace the brake pad as a set, otherwise braking performance will be adversely affected.
6) Locate the projection "A" of the brake pad to the center of caliper piston groove.
NOTE Make sure that the projection of the pad is seated onto the retainer on the caliper bracket.
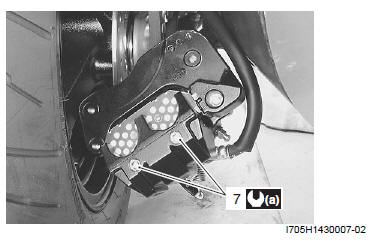
7) Tighten the pad mounting pins (7) to the specified torque.
Tightening torque
Pad mounting pin (a): 18 N*m (1.8 kgf-m, 13.0 lb-ft)
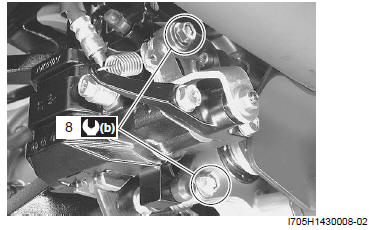
8) Tighten the caliper mounting bolts (8) to the specified torque.
Tightening torque
Caliper mounting bolt (b): 23 N*m (2.3 kgf-m, 16.5 lb-ft)
NOTE After replacing the brake pads, pump the brake lever several times in order to operate the brake correctly and then check the brake fluid level.
See also:
 Suzuki Burgman 400 - Service manual > Rear Brake Caliper Removal and Installation
Removal 1) Drain the brake fluid. Refer to "Brake Fluid Replacement". 2) Remove the brake hose from the caliper by removing the union bolt (1) and catch the brake fluid in a suitable receptacle.


