 Suzuki Burgman 400 - Service manual > Rear Brake Caliper Removal and Installation
Removal
1) Drain the brake fluid. Refer to "Brake Fluid Replacement".
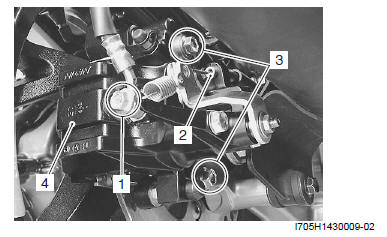
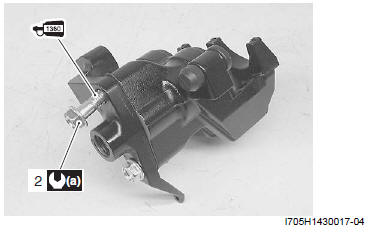
2) Remove the brake hose from the caliper by removing the union bolt (1) and catch the brake fluid in a suitable receptacle.
! CAUTION Place a rag underneath the union bolt on the brake caliper to catch any split brake fluid.
NOTE Slightly loosen the brake pad mounting pins to facilitate later disassembly, if necessary.
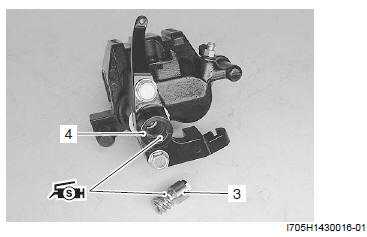
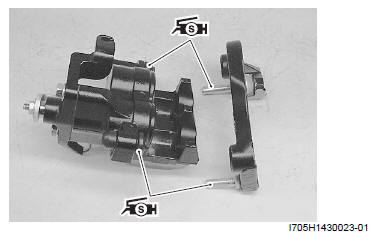
3) Remove the brake-lock cable (2), caliper mounting bolts (3) and brake caliper (4).
Installation
Install the brake caliper in the reverse order of removal.
Pay attention to the following points:
! CAUTION The seal washers should be replaced with the new ones to prevent fluid leakage.
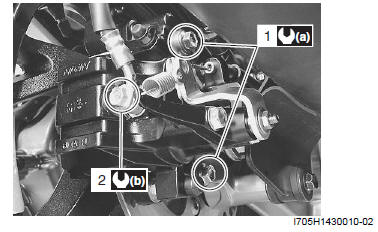
- Tighten the caliper mounting bolts (1) to the specified torque.
Tightening torque
Caliper mounting bolt (a): 23 N*m (2.3 kgf-m, 16.5 lb-ft)
- After setting the brake hose union to the stopper, tighten the union bolt (2) to the specified torque.
Tightening torque
Brake hose union bolt (b): 23 N*m (2.3 kgf-m, 16.5 lb-ft)
! CAUTION The seal washers should be replaced with the new ones to prevent fluid leakage.
- Bleed air from the brake system after installing the caliper. Refer to "Brake System Inspection".
- Check the brake fluid leakage and brake operation.
! WARNING Brake fluid, if it leaks, will interfere with safe running and discolor painted surfaces.
Check the brake hose and hose joints for cracks and fluid leakage.
Rear Brake Caliper Disassembly and Assembly
Refer to "Rear Brake Caliper Removal and Installation".
1) Remove the caliper bracket (1) and pad spring (2).
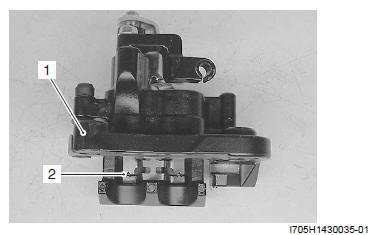
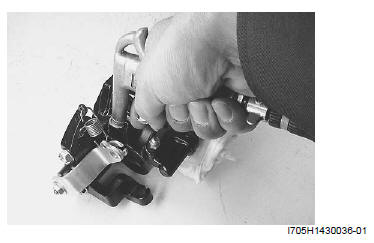
2) Place a rag over the piston to prevent it from popping out and then force out the piston (upper side) using compressed air.
! WARNING
- Use caution that brake fluid can splash out.
- Do not put your hand under the piston as it may pop out dangerously.
- When blowing compressed air in, hold the caliper securely.
! CAUTION Do not use high pressure air to prevent piston damage.
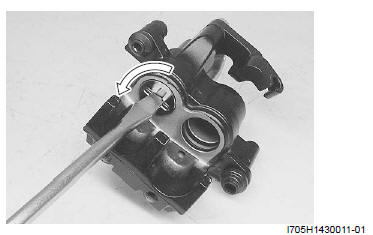
3) Remove the piston (back side) with turning counterclockwise.
4) Remove the dust seals (3) and piston seals (4) from the cylinder.
! CAUTION
- Use care not to cause scratch on the cylinder bore.
- Do not reuse the piston seal and dust seal that have been removed.

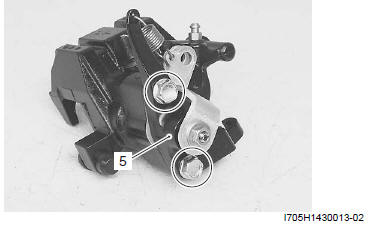
5) Remove the brake-lock housing bolt and brake-lock housing (5).
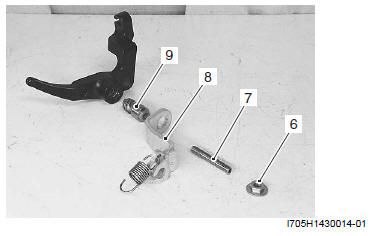
6) Remove the lock-nut (6), adjuster (7), arm (8) and brake-lock shaft (9).
Assembly
Assemble the caliper in the reverse order of disassembly. Pay attention to the following points:
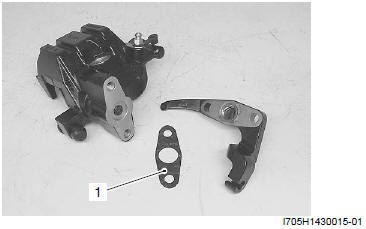
- Assemble the gasket (1).
! CAUTION Replace the gasket with a new one.
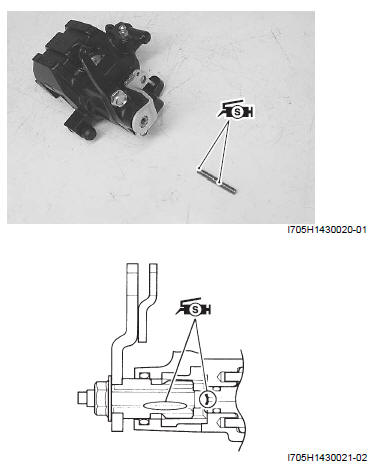
- Apply thread lock to the brake-lock housing bolts (2) and tighten them to the specified torque.
 : Thread lock
cement 99000-32130 (THREAD LOCK CEMENT SUPER 1360 or equivalent)
: Thread lock
cement 99000-32130 (THREAD LOCK CEMENT SUPER 1360 or equivalent)
Tightening torque
Brake-lock housing bolt (a): 22 N*m (2.2 kgf-m, 16.0 lb-ft)
- Apply silicone grease to the brake-lock shaft (3) and O-ring (4).
 : Grease
99000-25100 (SUZUKI Silicone Grease or equivalent)
: Grease
99000-25100 (SUZUKI Silicone Grease or equivalent)
! CAUTION Replace the O-ring with a new one.
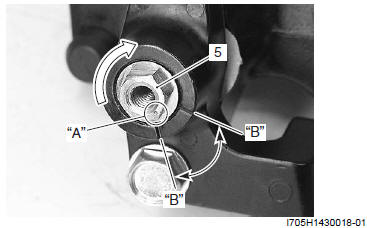
- Install the brake-lock shaft (5) so as the punch mark "A" may position between "B" of housing when tightening (turning clockwise) the brake-lock shaft.
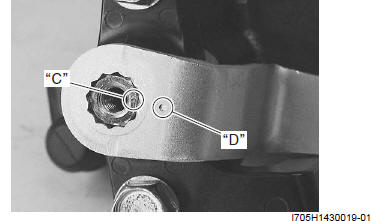
- Align the punch mark "C" on the brake-lock shaft with the punch mark "D" on the brake-lock arm.
- Apply silicone grease to the tip and thread of brakelock adjuster, assemble the lock-nut and spring temporarily.
: Grease
99000-25100 (SUZUKI Silicone Grease or equivalent)
- Wash the bore and piston of the caliper with specified brake fluid. Particularly wash the dust seal groove and piston seal groove.
BF: Brake fluid (DOT 4)
! CAUTION
- Wash the caliper components with fresh brake fluid before reassembly. Never use cleaning solvent or gasoline to wash them.
- Do not wipe the brake fluid off after washing the components.
- When washing the components, use the specified brake fluid. Never use different types of fluid or cleaning solvent such as gasoline, kerosine or the others.
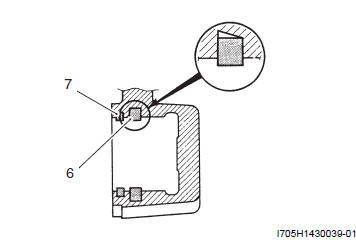
- Apply the brake fluid to piston seal (6) and dust seal (7).
! CAUTION Replace the piston seal (6) and dust seal (7) with the new ones.
BF: Brake fluid (DOT 4)
- Install the piston seals as shown in the figure.
- Set back the rear caliper piston (8) (back side) into the caliper with turning clockwise.

- Apply silicone grease to inside of the boot and caliper bracket pins and install them.
: Grease
99000-25100 (SUZUKI Silicone Grease or equivalent)
See also:
 Suzuki Burgman 400 - Service manual > Repair Instructions
Rear Brake Components Lock-nut Arm Adjuster Brake-lock shaft O-ring Brake-lock housing bolt Brake-lock housing Gasket Pad spring Air bleeder valve Boot Bracket Pad mounting pin Piston (Upper side) Dust seal Piston seal Piston (Lower side) Piston set Dust seal Piston seal Back plate Shim Brake pad : 22 N*m (2.2 kgf-m, 16.0 lb-ft) : 23 N*m (2.3 kgf-m, 16.5 lb-ft) : 18 N*m (1.8 kgf-m, 13.0 lb-ft) : 23 N*m (2.3 kgf-m, 16.5 lb-ft)
Suzuki Burgman 400 - Service manual > Brake Caliper Piston Disassembly and Assembly
Refer to "Rear Brake Caliper Disassembly and Assembly". Disassembly 1) Remove the snap ring (1). ! CAUTION Use caution when removing the snap ring as the parts inside may fly out of position.


