 Yamaha XMAX YP125R - Service manual > Bleeding the hydraulic brake system
WARNING
Bleed the hydraulic brake system whenever:
- The system is disassembled.
- A brake hose is loosened, disconnected or replaced.
- The brake fluid level is very low.
- The brake operation is faulty.
TIP
- Be careful not to spill any brake fluid or allow the brake master cylinder reservoir to overflow.
- When bleeding the hydraulic brake system, make sure there is always enough brake fluid before applying the brake. Ignoring this precaution could allow air to enter the hydraulic brake system, considerably lengthening the bleeding procedure.
- If bleeding is difficult, it may be necessary to let the brake fluid settle for a few hours. Repeat the bleeding procedure when the tiny bubbles in the hose have disappeared.
1. Bleed:
- Hydraulic brake system
a. Fill the brake master cylinder reservoir to the proper level with the recommended brake fluid.
b. Install the brake master cylinder reservoir diaphragm.
c. Connect a clear plastic hose "1" tightly to the bleed screw "2".
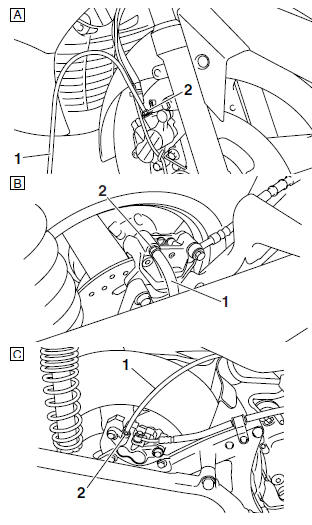
A. Front brake caliper
B. Rear brake caliper (YP125R)
C. Rear brake caliper (YP250R)
d. Place the other end of the hose into a container.
e. Slowly apply the brake several times.
f. Fully pull the brake lever and hold it in position.
g. Loosen the bleed screw.
TIP
Loosening the bleed screw will release the pressure and cause the brake lever to contact the throttle grip or handlebar grip.
h. Tighten the bleed screw, and then release the brake lever.
i. Repeat steps (e) to (h) until all of the air bubbles have disappeared from the brake fluid in the plastic hose.
j. Tighten the bleed screw to specification.
 Front brake caliper bleed screw 6 Nm (0.6 m*kgf, 4.3 ft*lbf)
Rear brake caliper bleed screw (YP125R) 14 Nm (1.4 m*kgf, 10 ft*lbf)
Rear brake caliper bleed screw (YP250R) 6 Nm (0.6 m*kgf, 4.3 ft*lbf)
k. Fill the brake master cylinder reservoir to the proper level with the recommended brake fluid.
WARNING
After bleeding the hydraulic brake system, check the brake operation.
Checking and adjusting the steering head
1. Stand the vehicle on a level surface.
WARNING
Securely support the vehicle so that there is no danger of it falling over.
TIP
Place the vehicle on a suitable stand so that the front wheel is elevated.
2. Check:
- Steering head
Grasp the bottom of the front fork legs and gently rock the front fork.
Binding/looseness → Adjust the steering head.
3. Remove:
- Lower handlebar holder
4. Adjust:
- Steering head
a. Remove the upper ring nut "1", the lock washer "2", the center ring nut "3" and the rubber washer.
b. Loosen the lower ring nut "4", and then tighten it to specification with the steering nut wrench "5".
 Lower ring nut (initial tightening torque) 38 Nm (3.8 m*kgf, 27 ft*lbf)
 Steering nut wrench 90890-01403 Exhaust flange nut wrench YU-A9472
TIP
- Be sure to install all the ring nuts with the broad side of the inner tapered section facing down.
- Set a torque wrench at a right angle to the steering nut wrench.
c. Loosen the lower ring nut "4" 1/4 of a turn, and then tighten it to specification with a steering nut wrench.
WARNING
Do not overtighten the lower ring nut.
 Lower ring nut (final tightening torque) 22 Nm (2.2 m*kgf, 16 ft*lbf)
d. Check the steering head for looseness or binding by turning the front fork all the way in both directions. If any binding is felt, remove the lower bracket and check the upper and lower bearings.
e. Install the rubber washer.
f. Install the center ring nut.
g. Finger tighten the center ring nut, and then align the slots of both ring nuts. If necessary, hold the lower ring nut and tighten the center ring nut until their slots are aligned.
TIP
Align the slots by turning the center ring nut in the tightening direction.
h. Install the lock washer "2".
TIP
Make sure the lock washer tabs "a" sit correctly in the ring nut slots "b".
i. Hold the lower and center ring nuts with a steering nut wrench and tighten the upper ring nut with another steering nut wrench.
 Steering nut wrench 90890-01403
Exhaust flange nut wrench YU-A9472
 Upper ring nut 75 Nm (7.5 m*kgf, 54 ft*lbf)
5. Install:
- Lower handlebar hold
See also:
 Yamaha XMAX YP125R - Service manual > Checking the brake fluid level
1. Stand the vehicle on a level surface. TIP Place the vehicle on the centerstand. Make sure the vehicle is upright. 2. Check: Brake fluid level
Yamaha XMAX YP125R - Service manual > Checking the front fork
1. Stand the vehicle on a level surface. WARNING Securely support the vehicle so that there is no danger of it falling over. 2. Check: Inner tubes


