 Yamaha XMAX YP125R - Service manual > Checking the condition of the bulb sockets
The following procedure applies to all of the bulb sockets.
1. Check:
- Bulb socket (for continuity) (with the pocket tester) No continuity → Replace.
 Pocket tester 90890-03112
Analog pocket tester YU-03112-C
TIP
Check each bulb socket for continuity in the same manner as described in the bulb section, however, note the following.
a. Install a good bulb into the bulb socket.
b. Connect the pocket tester probes to the respective leads of the bulb socket.
c. Check the bulb socket for continuity. If any of the readings indicate no continuity, replace the bulb socket.
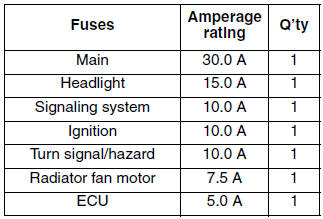
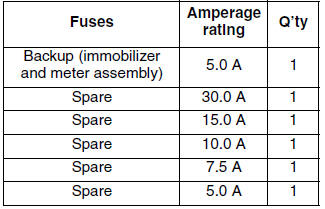
Checking the fuses
The fuse box, which contains the fuses for the individual circuits, is located behind the upper panel. The main fuse and spare fuse (30.0 A) are located behind the front cowling assembly.
NOTICE
To avoid a short circuit, always set the main switch to "OFF" when checking or replacing a fuse.
1. Remove:
- Upper panel and/or front cowling assembly Refer to "GENERAL CHASSIS"
2. Check:
- Fuse
a. Connect the pocket tester to the fuse and check the continuity.
TIP
Set the pocket tester selector to "Ω × 1".
 Pocket tester 90890-03112
Analog pocket tester YU-03112-C
b. If the pocket tester indicates "∞", replace the fuse.
3. Replace:
- Blown fuse
a. Set the main switch to "OFF".
b. Install a new fuse of the correct amperage rating.
c. Set on the switches to verify if the electrical circuit is operational.
d. If the fuse immediately blows again, check the electrical circuit.
WARNING
Never use a fuse with an amperage rating other than that specified. Improvising or using a fuse with the wrong amperage rating may cause extensive damage to the electrical system, cause the lighting and ignition systems to malfunction and could possibly cause a fire.
4. Install:
- Upper panel and/or front cowling assembly Refer to "GENERAL CHASSIS"
Checking and charging the battery
WARNING
Batteries generate explosive hydrogen gas and contain electrolyte which is made of poisonous and highly caustic sulfuric acid.
Therefore, always follow these preventive measures:
- Wear protective eye gear when handling or working near batteries.
- Charge batteries in a well-ventilated area.
- Keep batteries away from fire, sparks or open flames (e.g., welding equipment, lighted cigarettes).
- DO NOT SMOKE when charging or handling batteries.
- KEEP BATTERIES AND ELECTROLYTE OUT OF REACH OF CHILDREN.
- Avoid bodily contact with electrolyte as it can cause severe burns or permanent eye injury.
FIRST AID IN CASE OF BODILY CONTACT: EXTERNAL
- Skin - Wash with water.
- Eyes - Flush with water for 15 minutes and get immediate medical attention.
INTERNAL
- Drink large quantities of water or milk followed with milk of magnesia, beaten egg or vegetable oil. Get immediate medical attention.
NOTICE
- This is a VRLA (Valve Regulated Lead Acid) battery. Never remove the sealing caps because the balance between cells will not be maintained and battery performance will deteriorate.
- Charging time, charging amperage and charging voltage for a VRLA (Valve Regulated Lead Acid) battery are different from those of conventional batteries. The VRLA (Valve Regulated Lead Acid) battery should be charged according to the appropriate charging method. If the battery is overcharged, the electrolyte level will drop considerably.
Therefore, take special care when charging the battery.
TIP
Since VRLA (Valve Regulated Lead Acid) batteries are sealed, it is not possible to check the charge state of the battery by measuring the specific gravity of the electrolyte. Therefore, the charge of the battery has to be checked by measuring the voltage at the battery terminals.
1. Remove:
- Upper panel
2. Disconnect:
- Battery leads (from the battery terminals)
NOTICE
First, disconnect the negative battery lead "1", and then the positive battery lead "2".
3. Remove:
- Battery
4. Check:
- Battery charge
a. Connect a pocket tester to the battery terminals.
- Positive tester probe → positive battery terminal
- Negative tester probe → negative battery terminal
TIP
- The charge state of a VRLA (Valve Regulated Lead Acid) battery can be checked by measuring its open-circuit voltage (i.e., the voltage when the positive battery terminal is disconnected).
- No charging is necessary when the open-circuit voltage equals or exceeds 12.8 V.
b. Check the charge of the battery, as shown in the charts and the following example.
Example
Open-circuit voltage = 12.0 V
Charging time = 6.5 hours
Charge of the battery = 20-30%
- Open-circuit voltage (V)
- Charging time (hours)
- Relationship between the open-circuit voltage and the charging time at 20 ºC (68 ºF)
- These values vary with the temperature, the condition of the battery plates, and the electrolyte level.
- Open-circuit voltage (V)
- Charging condition of the battery (%)
- Ambient temperature 20 ºC (68 ºF)
5. Charge:
- Battery (refer to the appropriate charging method)
WARNING
Do not quick charge a battery.
NOTICE
- Do not use a high-rate battery charger since it forces a high-amperage current into the battery quickly and can cause battery overheating and battery plate damage.
- If it is impossible to regulate the charging current on the battery charger, be careful not to overcharge the battery.
- When charging a battery, be sure to remove it from the vehicle. (If charging has to be done with the battery mounted on the vehicle, disconnect the negative battery lead from the battery terminal.)
- To reduce the chance of sparks, do not plug in the battery charger until the battery charger leads are connected to the battery.
- Before removing the battery charger lead clips from the battery terminals, be sure to turn off the battery charger.
- Make sure the battery charger lead clips are in full contact with the battery terminal and that they are not shorted. A corroded battery charger lead clip may generate heat in the contact area and a weak clip spring may cause sparks.
- If the battery becomes hot to the touch at any time during the charging process, disconnect the battery charger and let the battery cool before reconnecting it. Hot batteries can explode!
- As shown in the following illustration, the open-circuit voltage of a VRLA (Valve Regulated Lead Acid) battery stabilizes about 30 minutes after charging has been completed.
Therefore, wait 30 minutes after charging is completed before measuring the open-circuit voltage.
- Open-circuit voltage (V)
- Time (minutes)
- Charging
- Ambient temperature 20 ºC (68 ºF)
- Check the open-circuit voltage.
See also:
 Yamaha XMAX YP125R - Service manual > Checking the switches
Start switch Hazard switch Front brake light switch Main switch Dimmer switch Pass switch Turn signal switch Horn switch Rear brake light switch Sidestand switch
Yamaha XMAX YP125R - Service manual > Charging method using a constant voltage charger
a. Measure the open-circuit voltage prior to charging. TIP Voltage should be measured 30 minutes after the engine is turned off. b. Connect a charger and ammeter to the battery and start charging.


